
Get started with Wonder MCP
Connect Wonder to your coding agent over MCP so design changes and code changes stay in sync.
On this page
Design and code have always lived in separate worlds. Wonder changes that. The Wonder MCP server gives your AI coding agent direct read and write access to your Wonder canvas, so you can pull designs into code or push code back into designs.
You need a Wonder account with at least one file. The MCP server is free on every plan, including the free tier.
What is Wonder MCP?
Wonder's MCP server plugs into coding agents (Claude, Cursor, and others) so that designs created in Wonder can be read, edited, and updated by your agent, and vice versa.
How it works
Wonder connects to your agent through the Wonder MCP server at https://mcp.wonder.so/mcp. On first use you'll sign in through a standard OAuth flow. There are no API keys to manage, and tokens refresh automatically.
For Cursor, install Wonder from Cursor's plugin marketplace. Claude Code and Codex support the Wonder plugin directly.
Install
Pick your agent below. We currently support Cursor, Claude Code, Claude Desktop, Claude custom connectors, Codex, Antigravity, Lovable, and custom MCP clients.
 Cursor
- Click Browse Marketplace.
- Search for Wonder and open the result.
- Click Add.
- Click Manage. Wonder should now appear under MCP.
- Click Authenticate and complete the browser sign-in.
 Claude Code
Plugin (recommended)
Open your terminal and run claude to start Claude Code. Add the marketplace:
/plugin marketplace add aquila-lab/wonder-plugins
Install the plugin:
/plugin install wonder@wonder
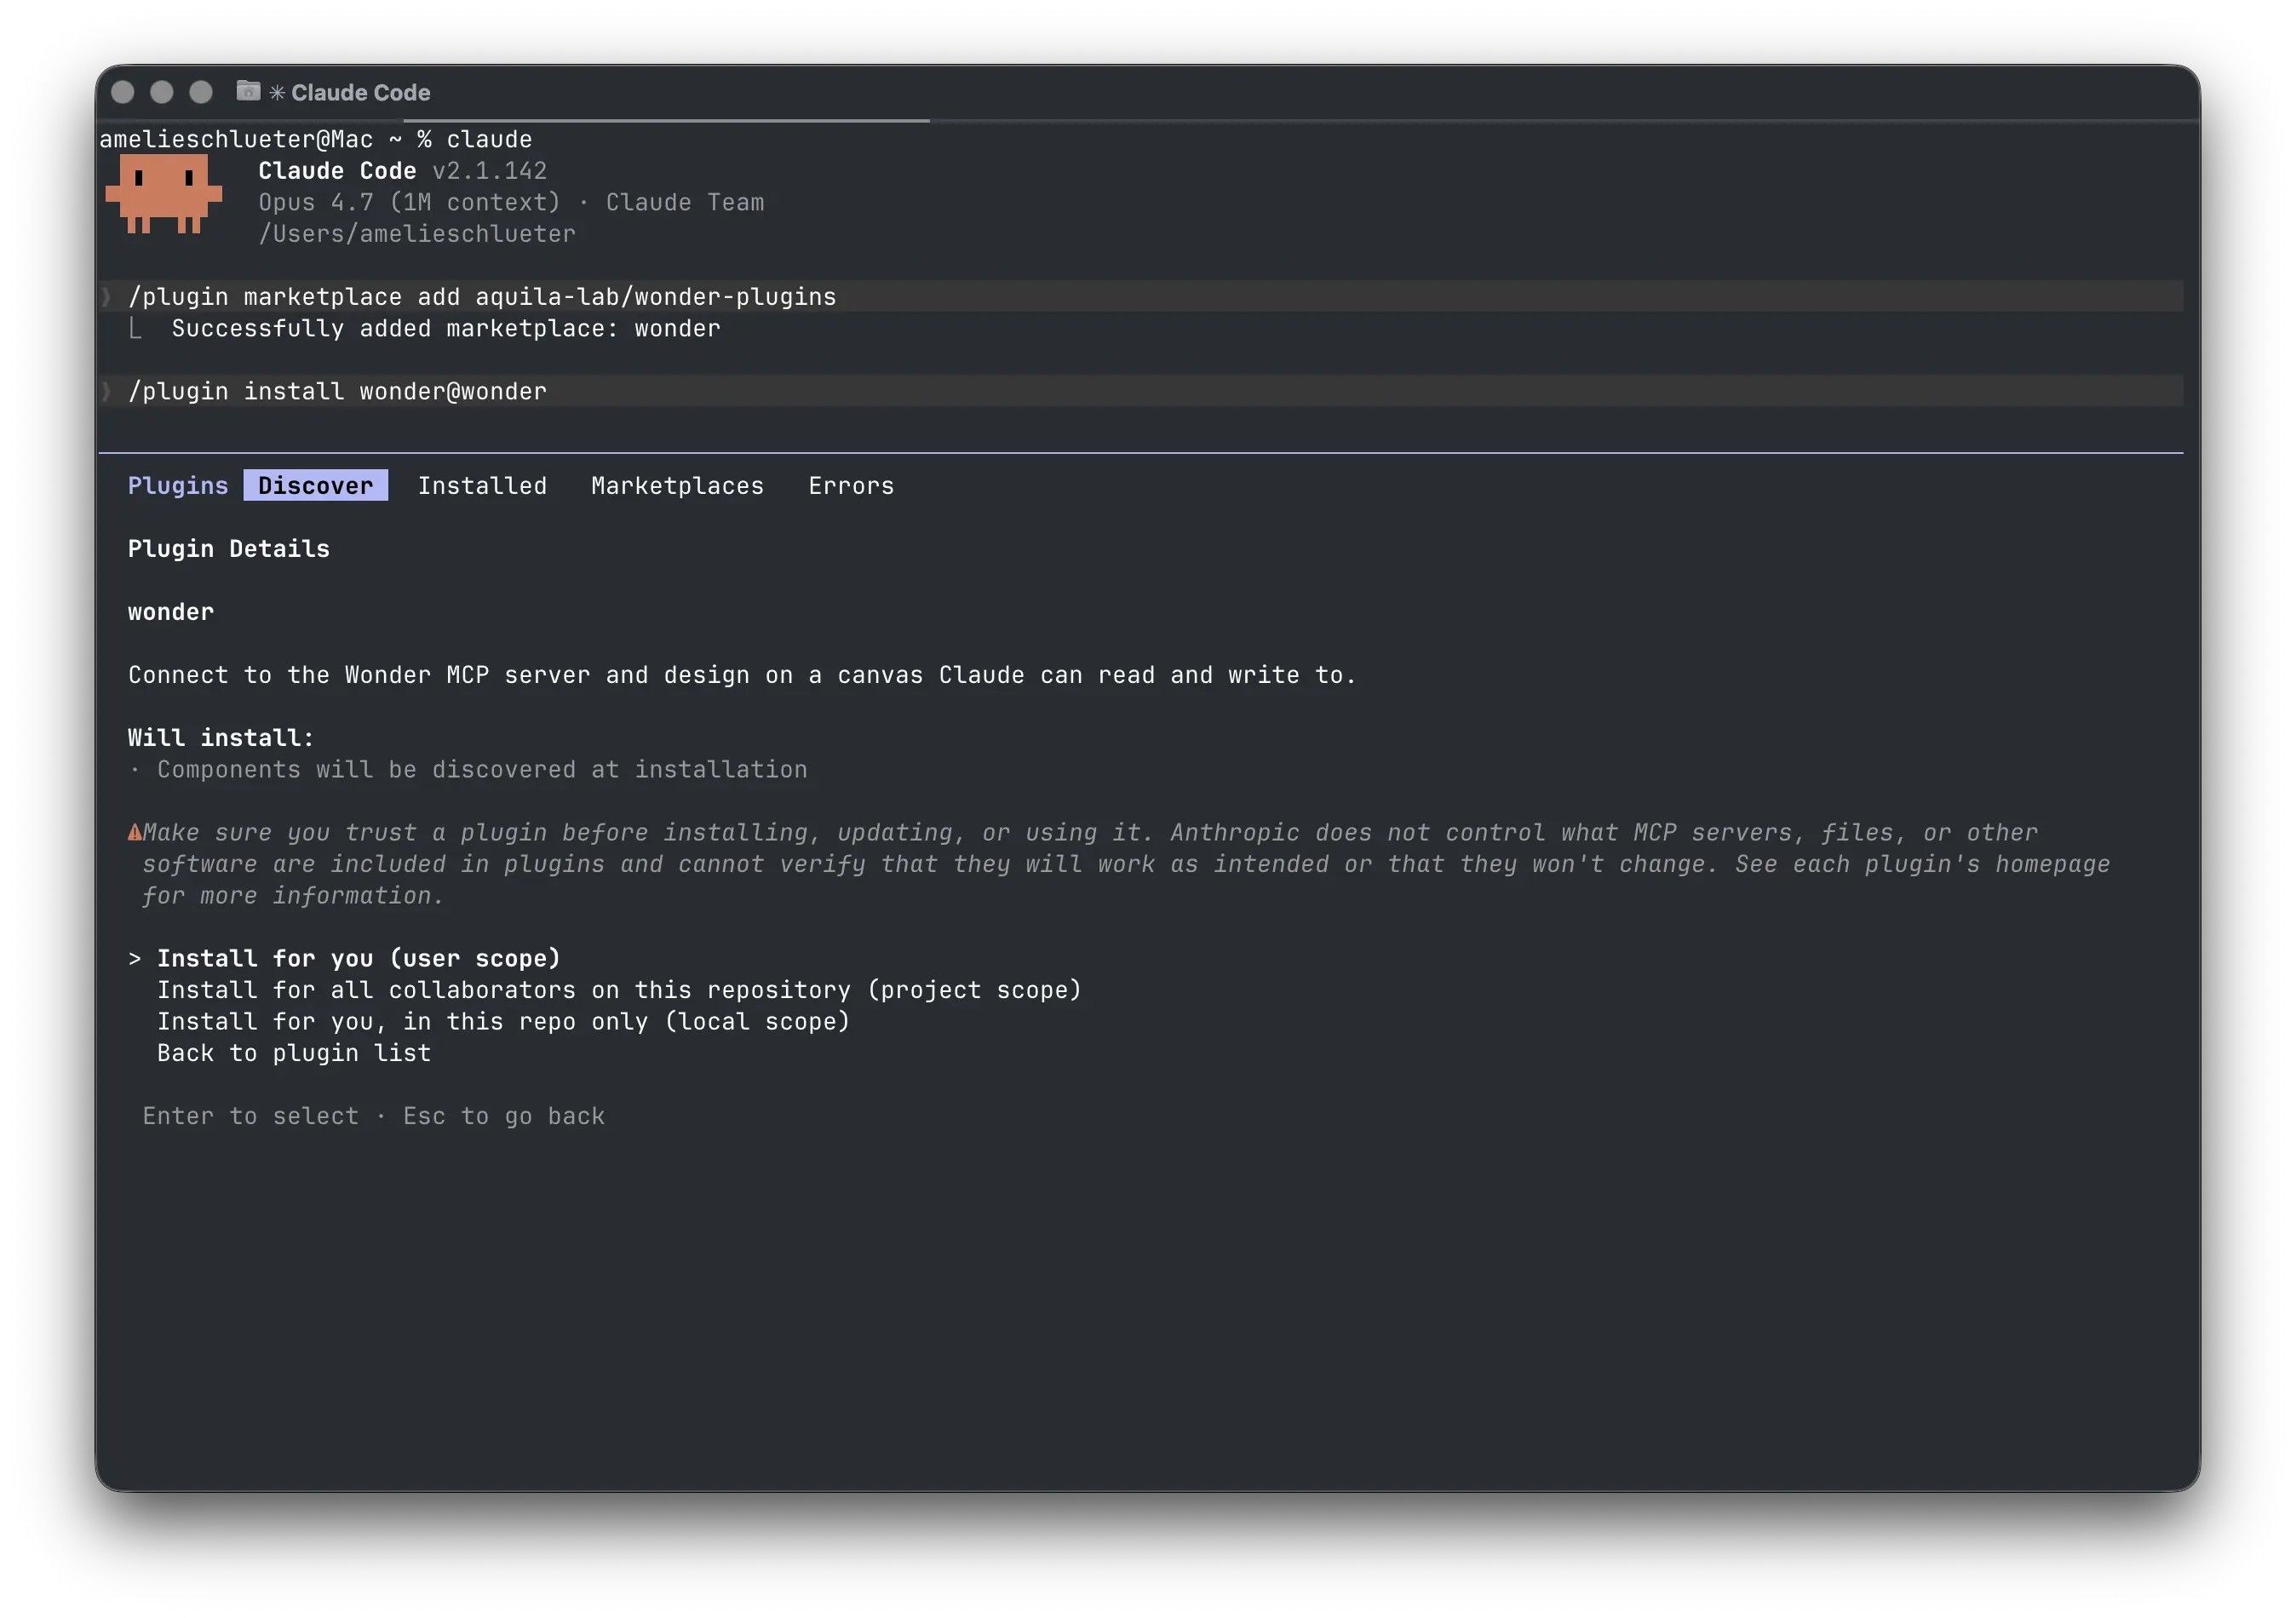
Reload to activate it:
/reload-plugins
To check if it worked, run /plugin and confirm that Wonder appears under installed.
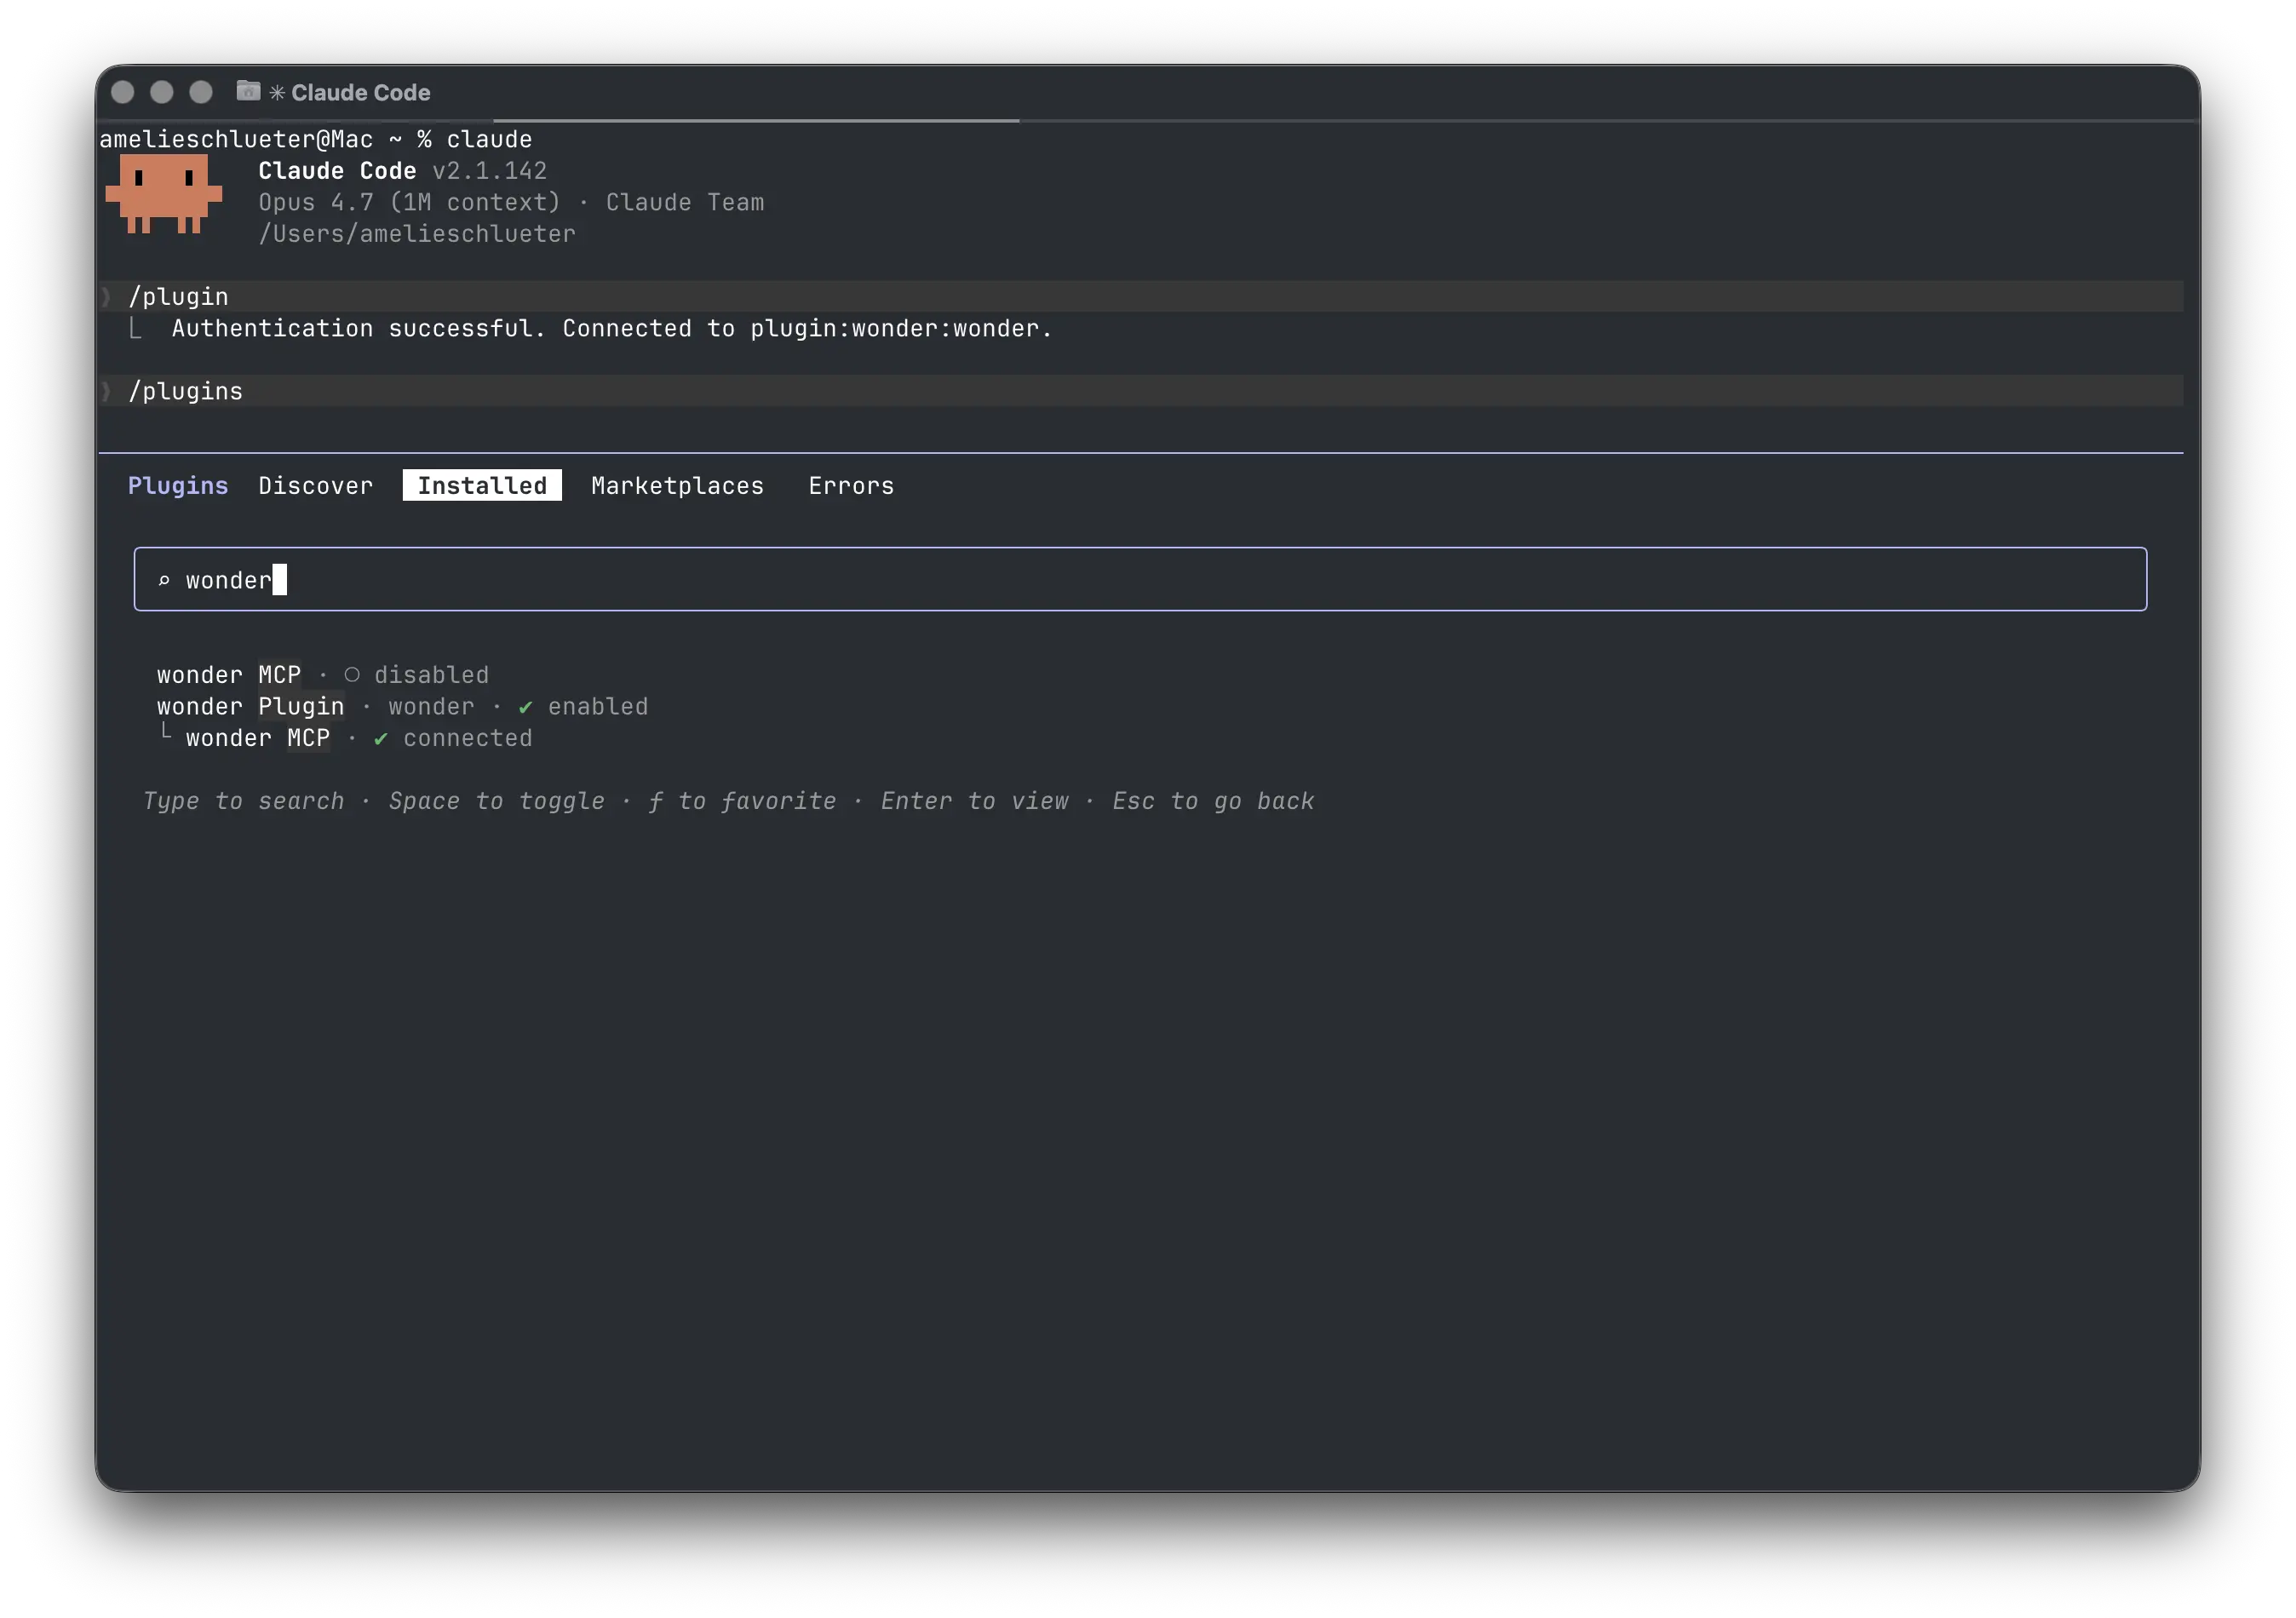
Open the Wonder app and any canvas file you want generations drawn to. Then, back in Claude Code, type a prompt like:
Generate a purple button in Wonder
On first use, Claude will say the Wonder MCP needs authentication and print a URL. Open that link in your browser to authorize, then come back to Claude Code and re-send the same prompt. Watch it draw onto your canvas in real time.
Manual setup
- Open the terminal on your computer.
- Run the command below (not inside Claude) to register the Wonder MCP server:
claude mcp add --transport http wonder https://mcp.wonder.so/mcp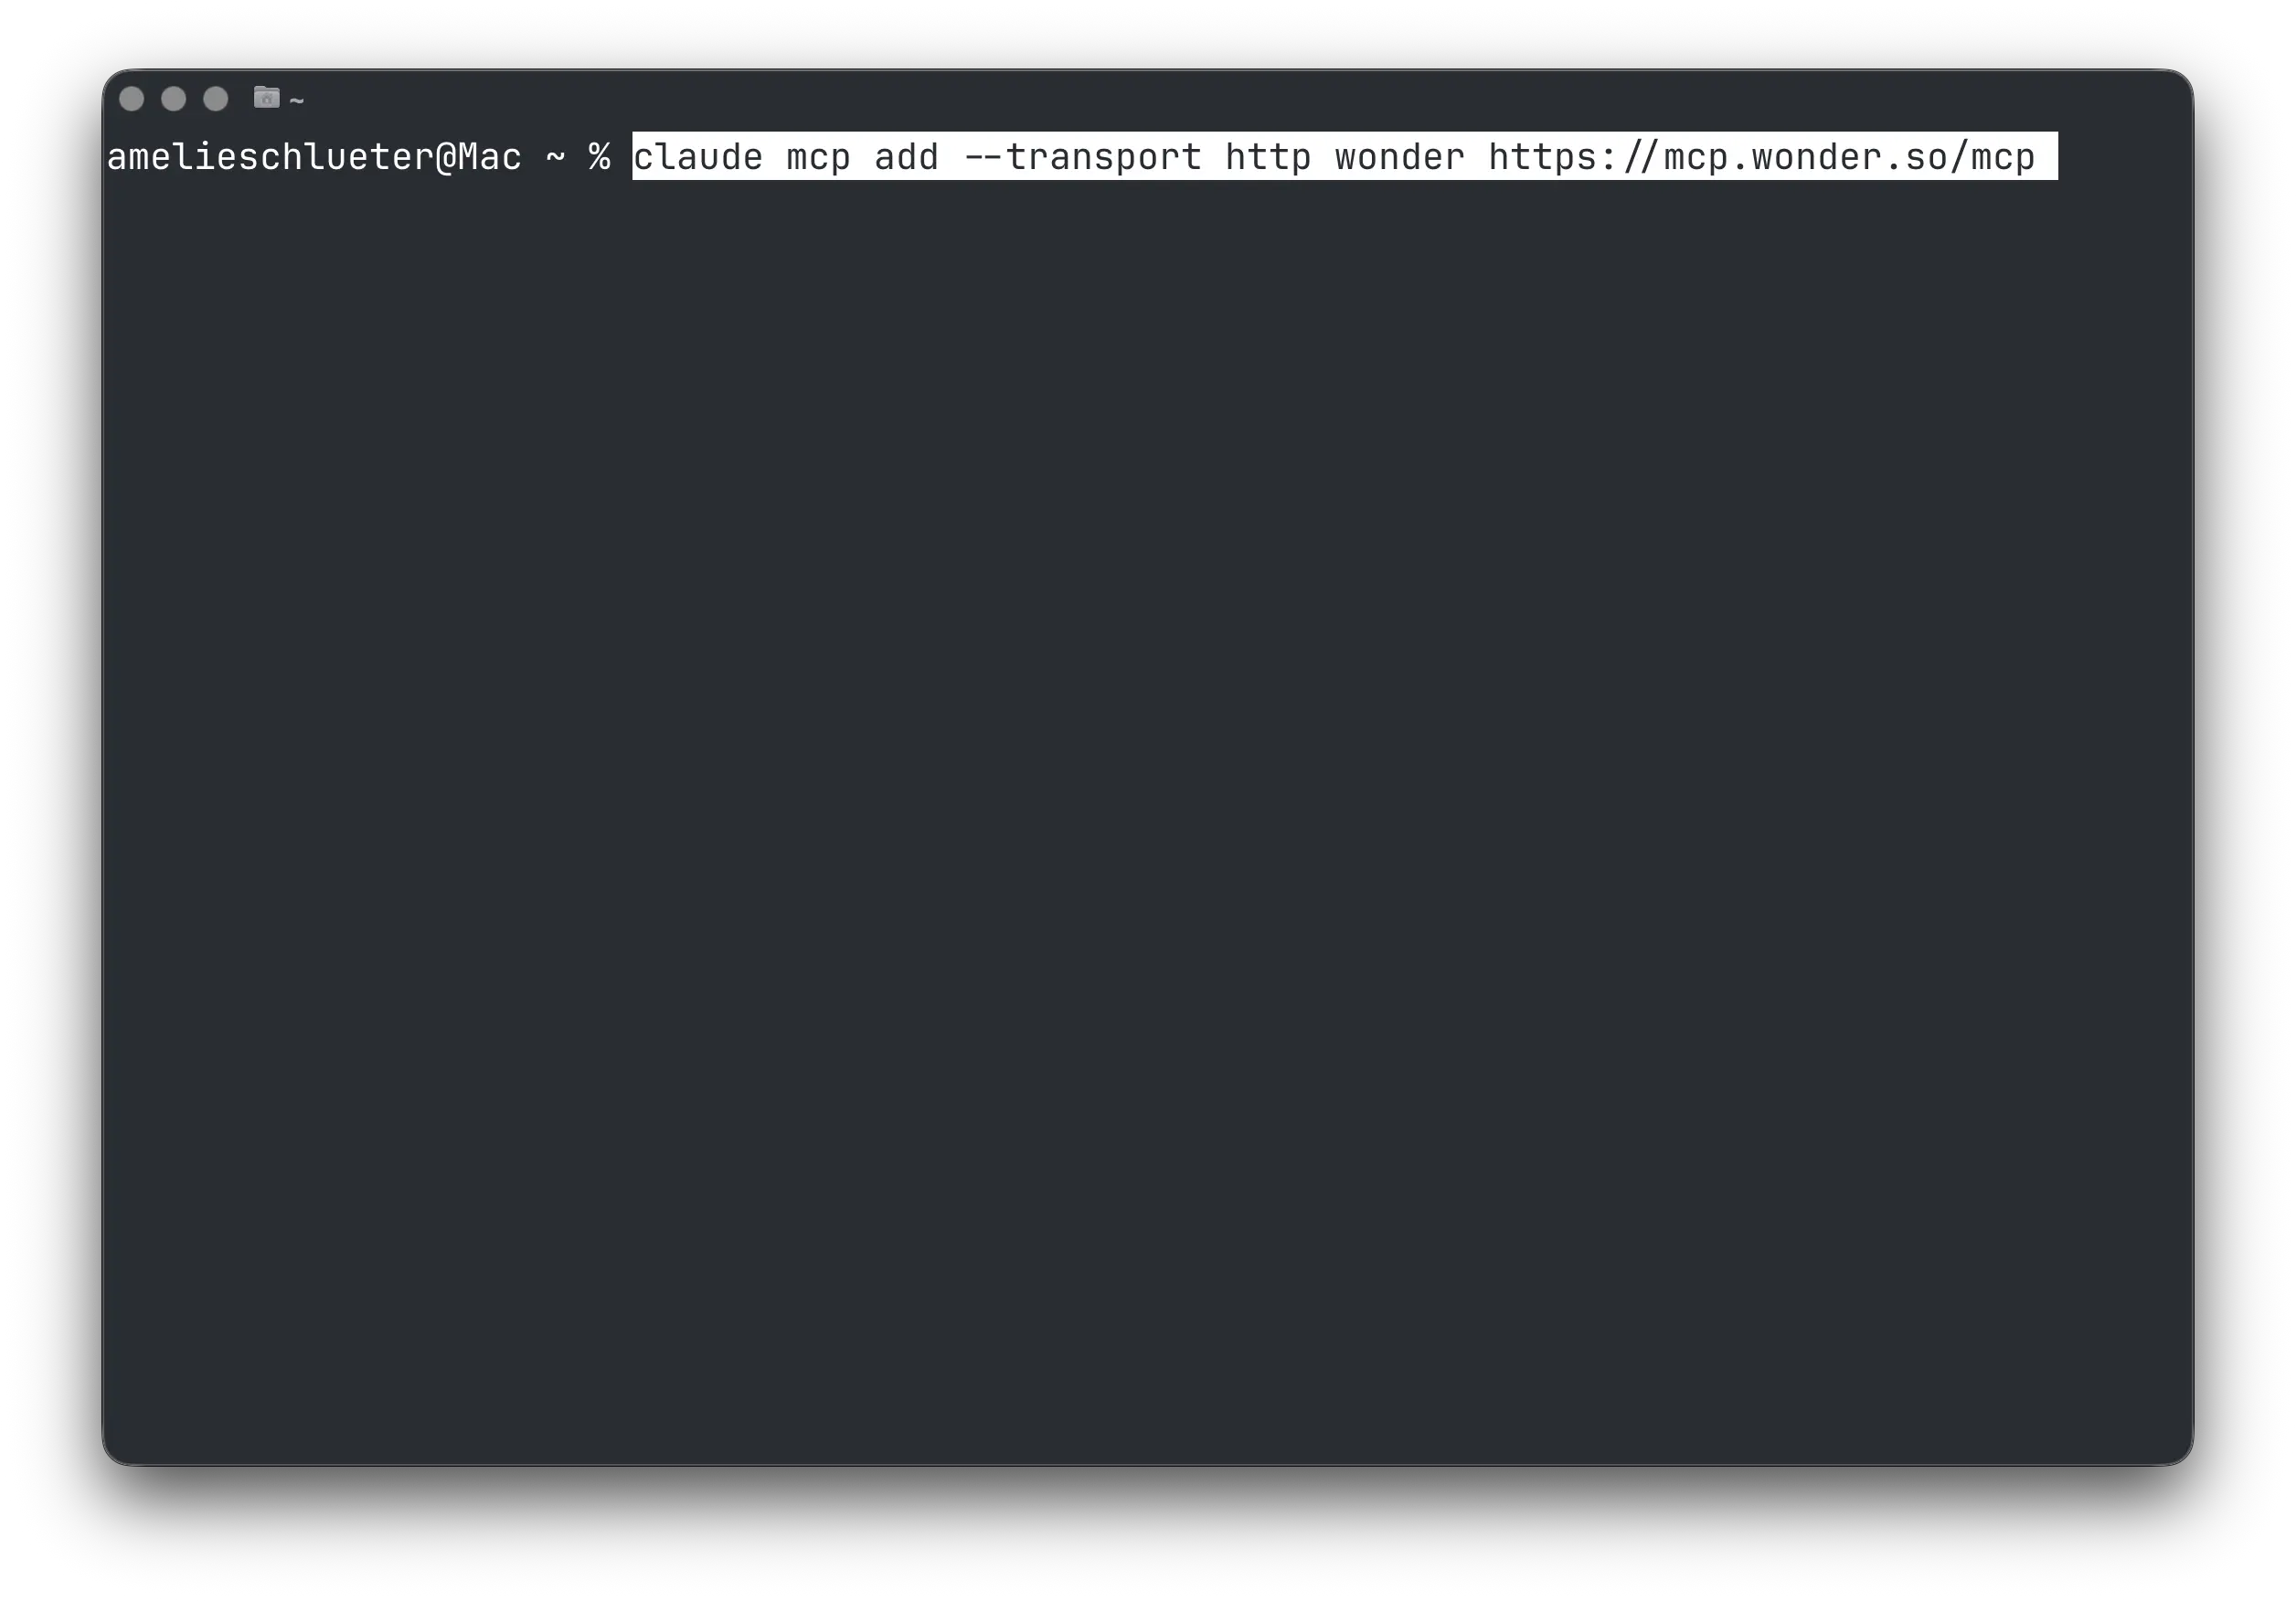
- Run
claude mcp listto confirm the Wonder server appears.
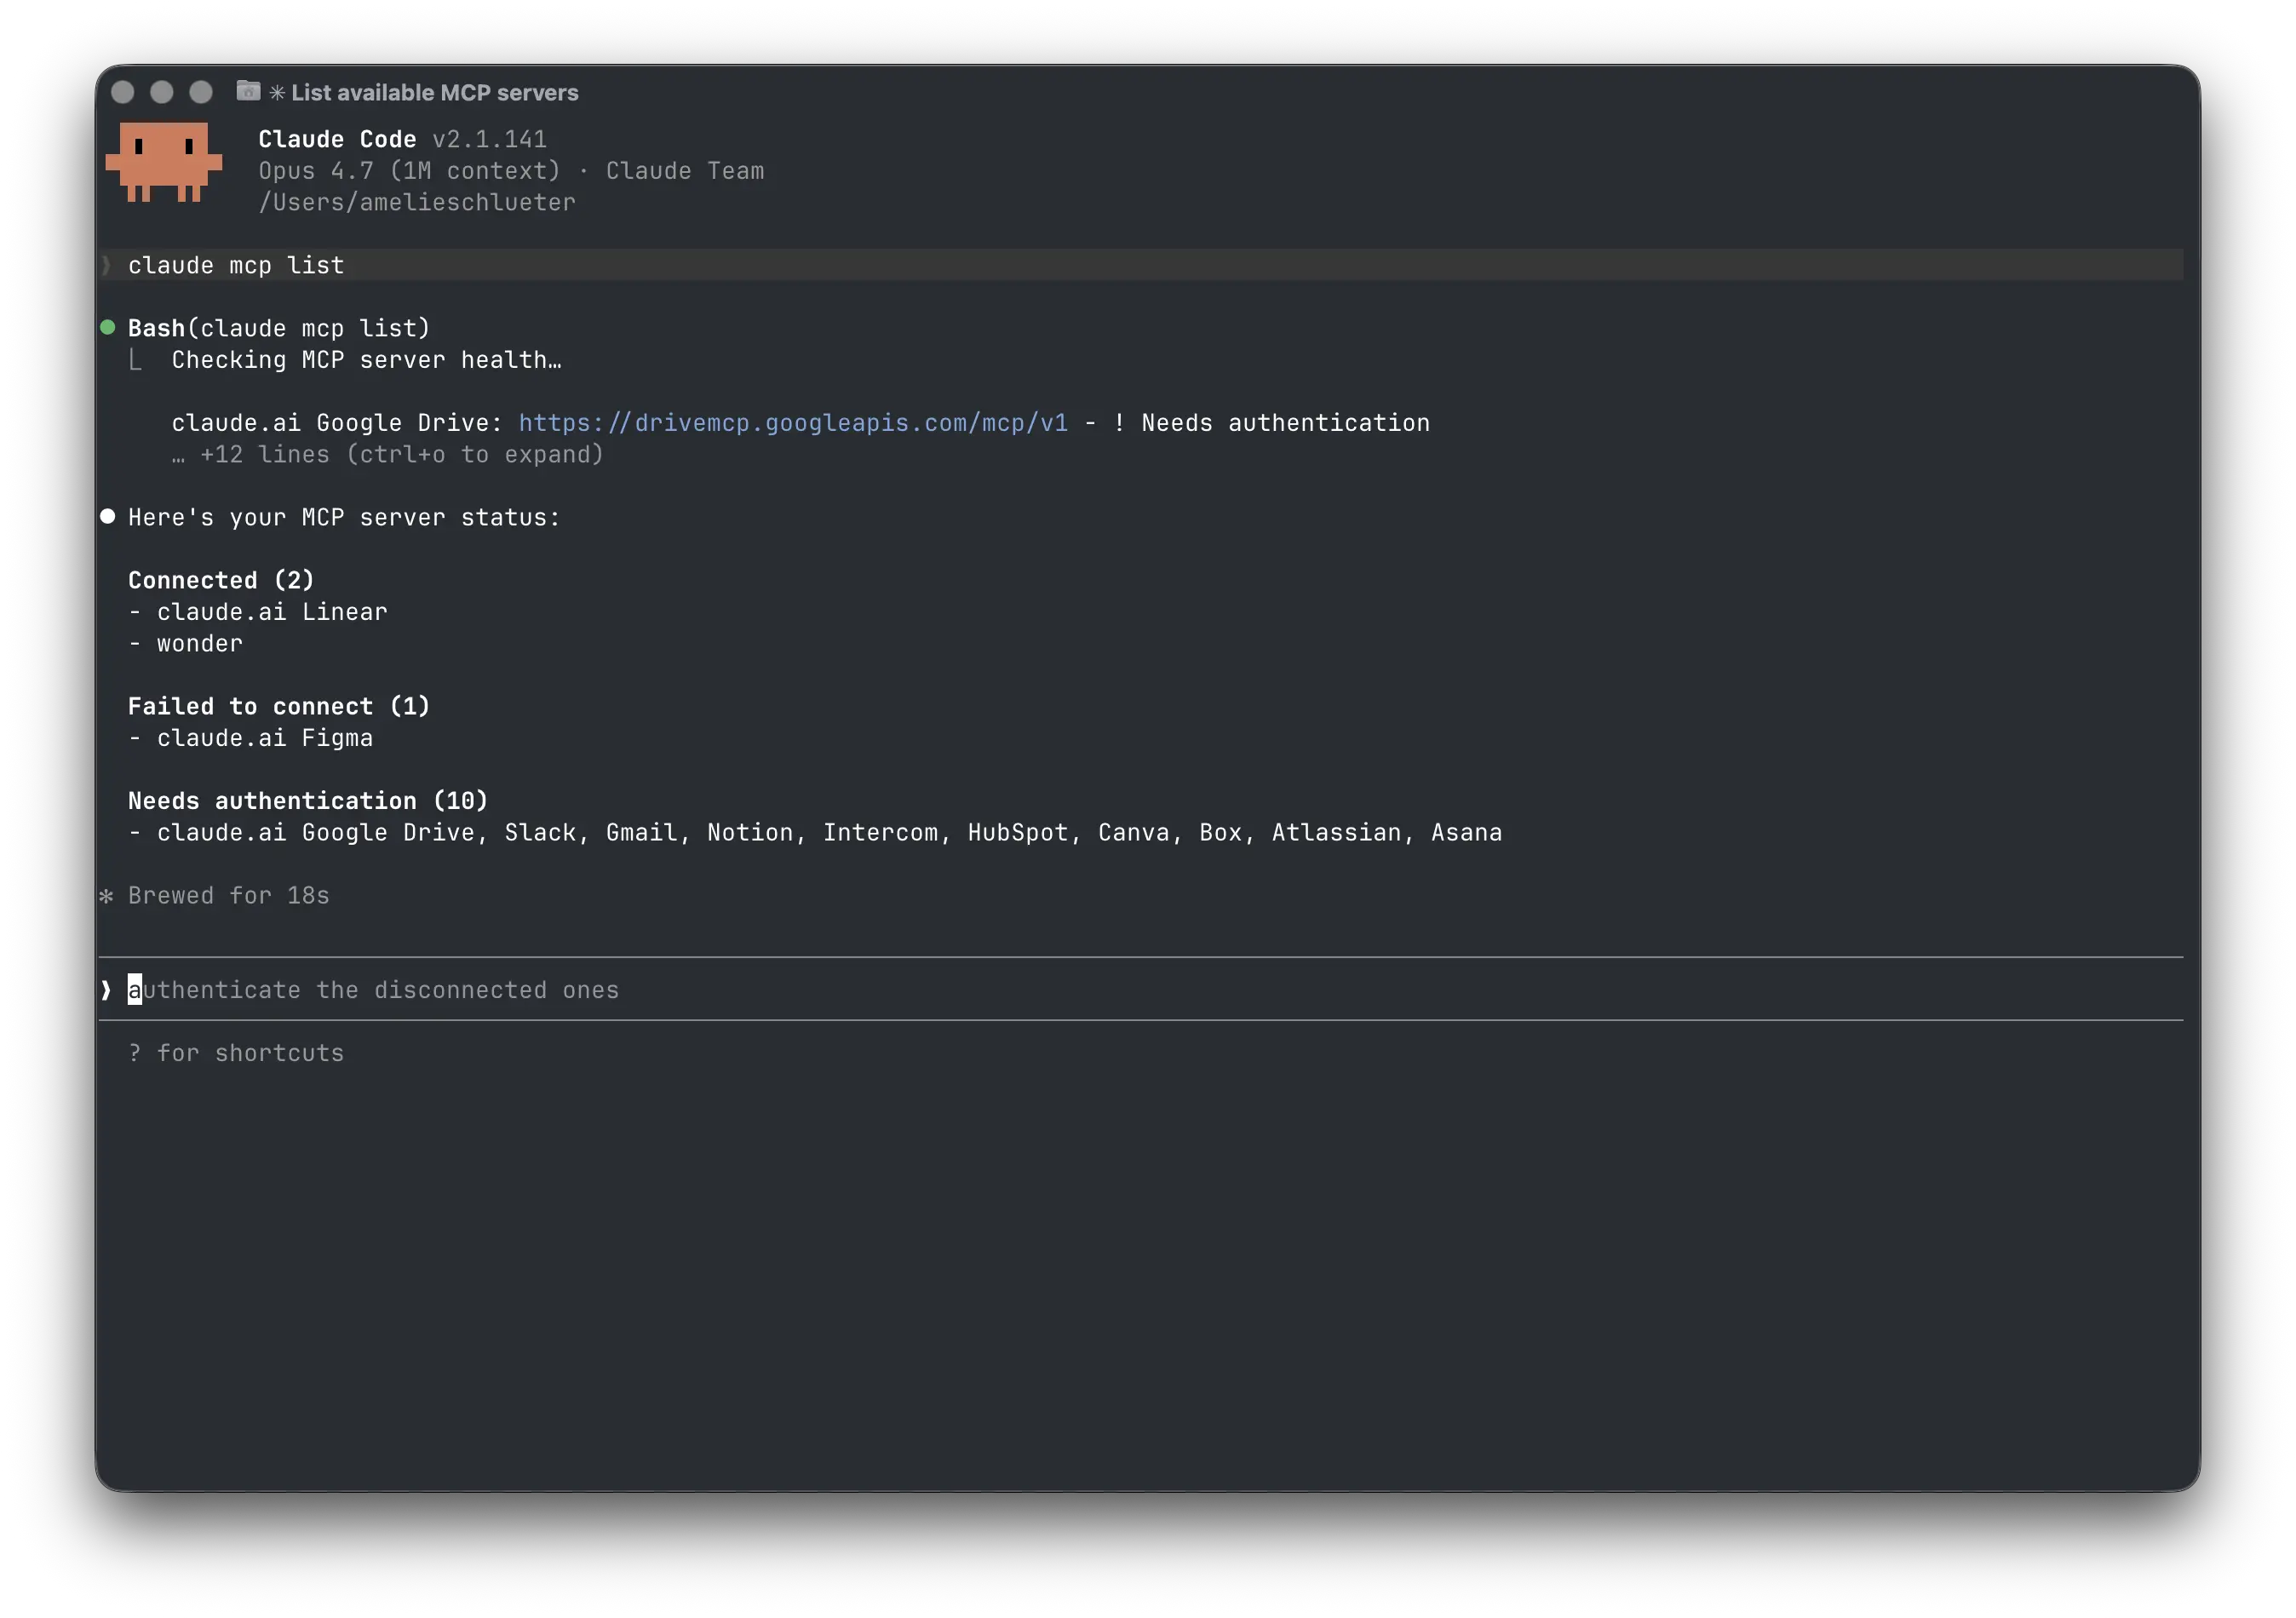
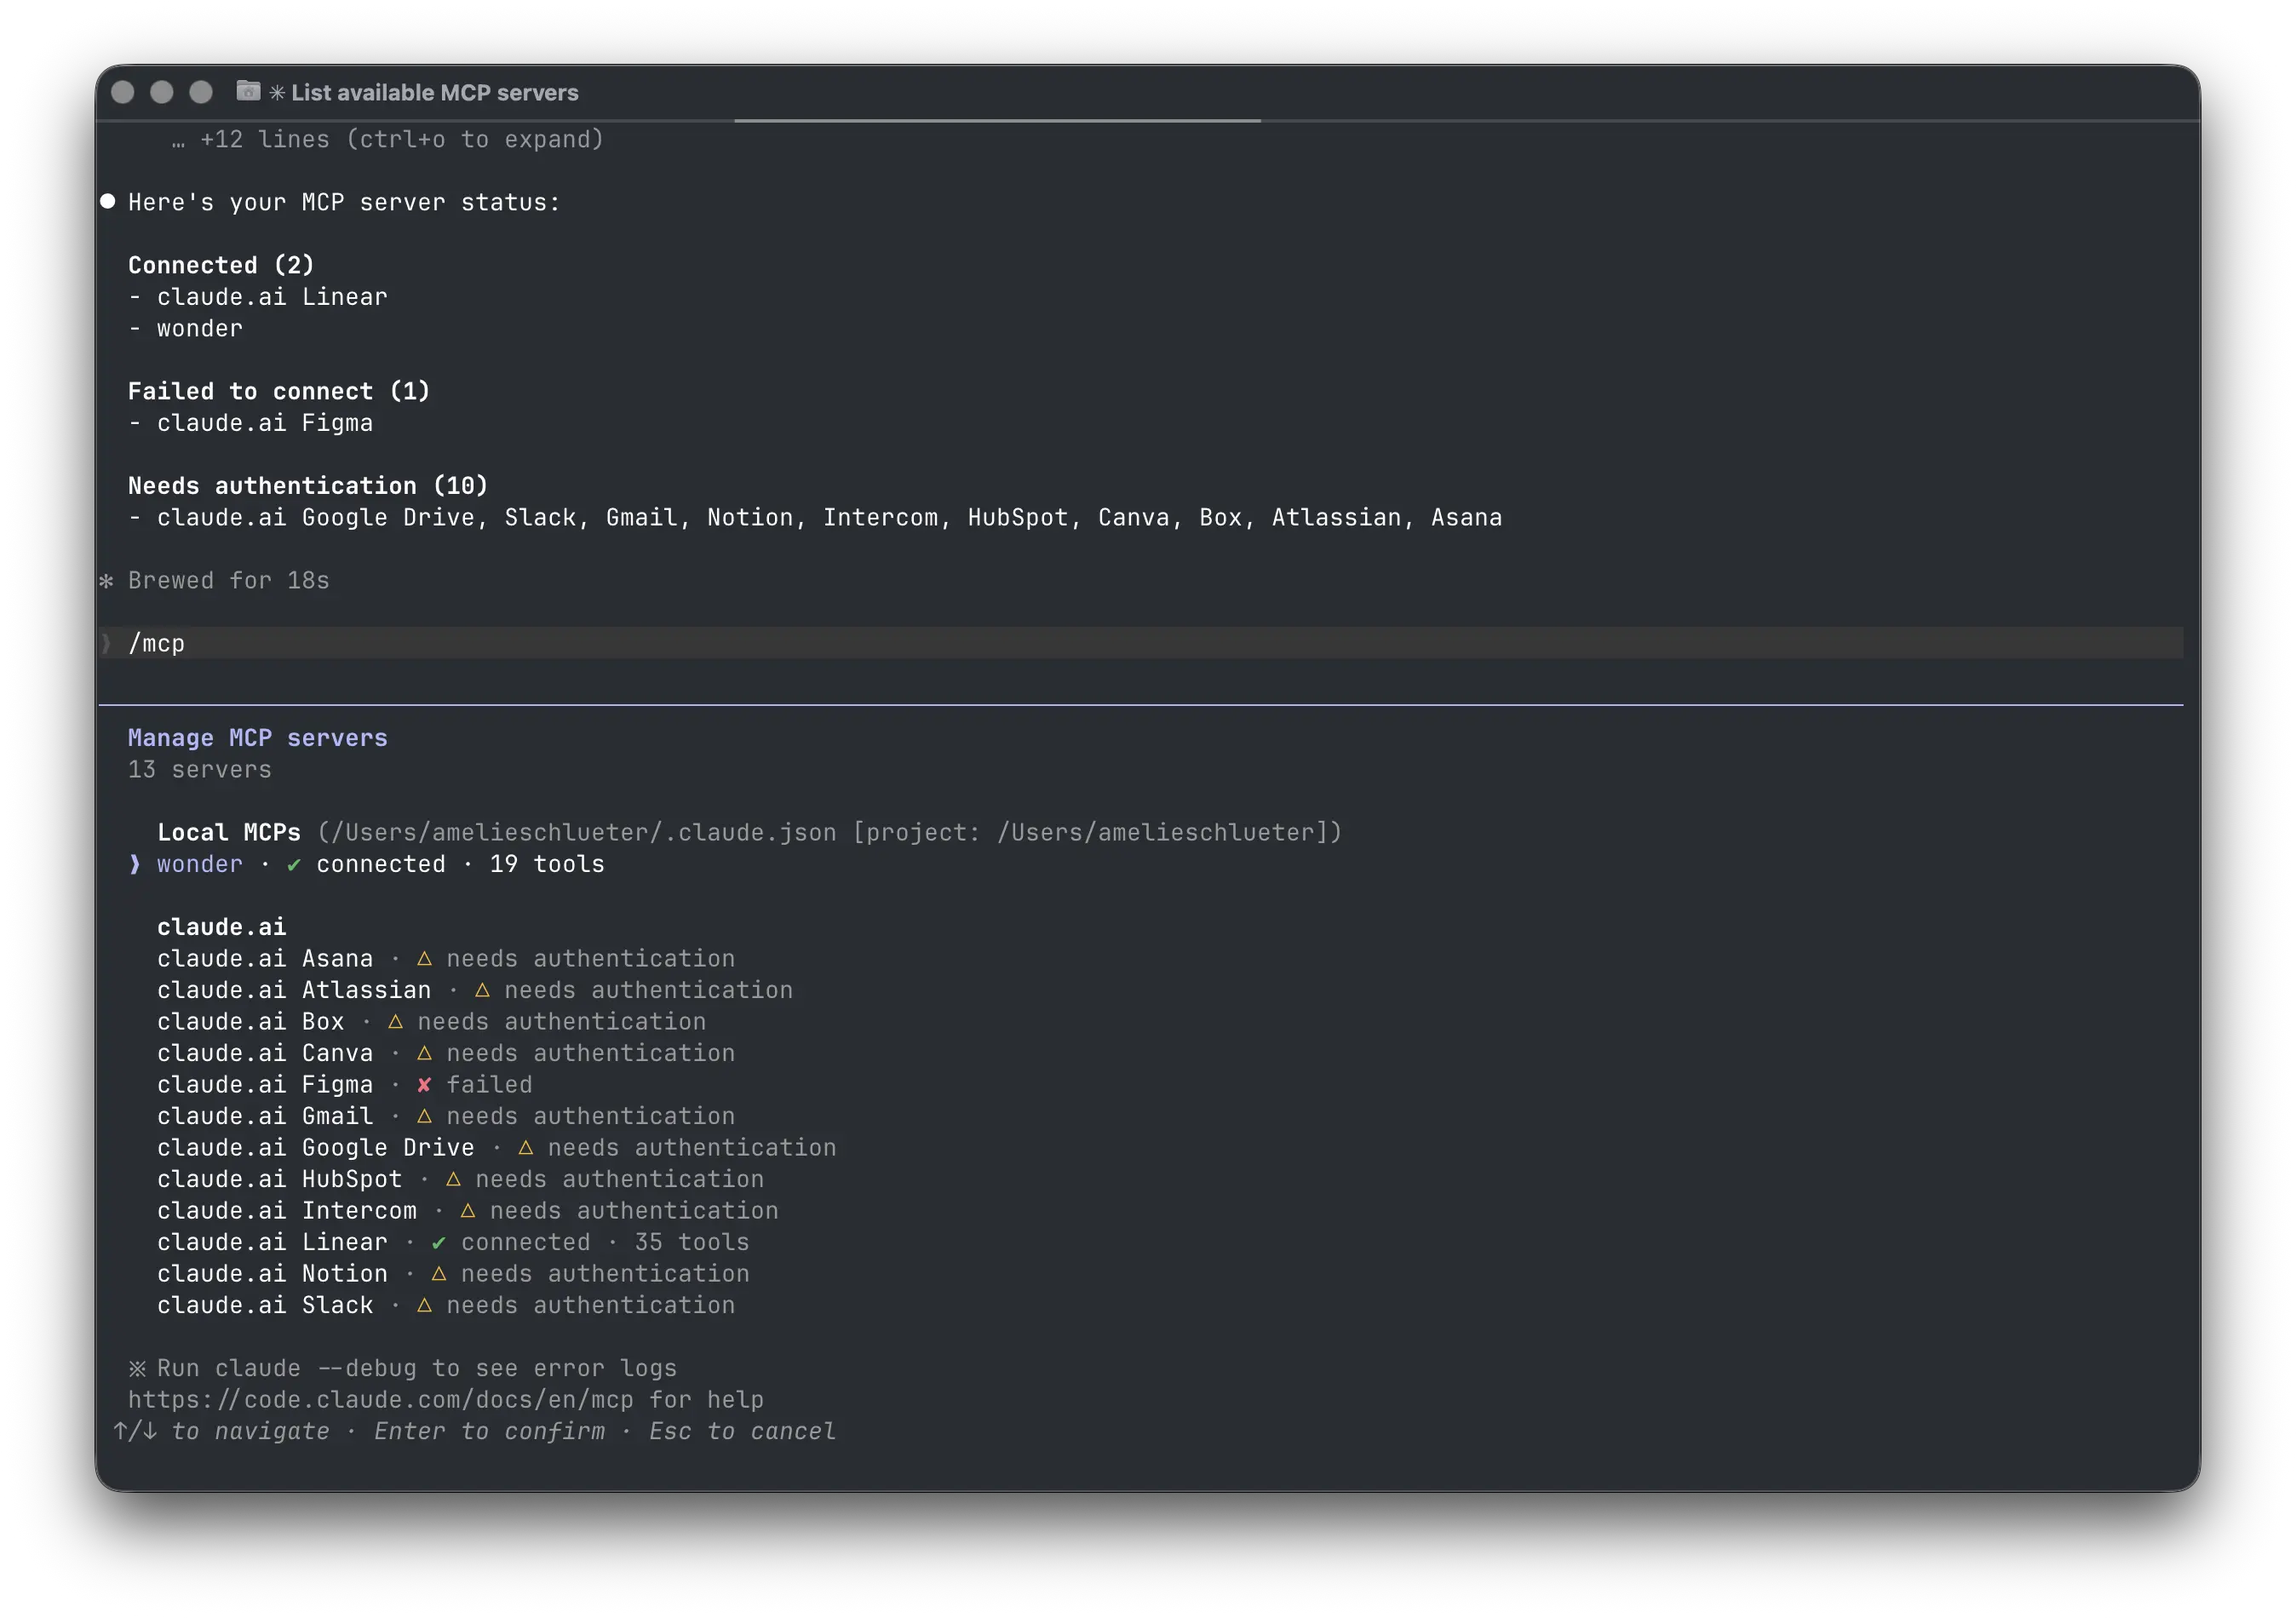
- Open a Claude Code session and run
/mcp. You should see Wonder in the list of MCPs. If you don't, restart your Claude session. Wonder will prompt you to sign in to your account in the browser. Once done, your agent is connected. Tokens refresh automatically, so you should only need to do this once.
If you have trouble setting up Claude Code, watch this tutorial or ask any AI agent to walk you through it.
Claude Desktop
Plugin (recommended)
- Open your Claude Desktop app and navigate to the Code tab in the top-left corner.
- Click on Customize.
- Click the plus icon under Personal Plugins > Create Plugin > Add Marketplace.
- Enter the Wonder plugin URL in the field:
aquila-lab/wonder-plugins. - Click Sync and add the Wonder plugin that appears to Claude.
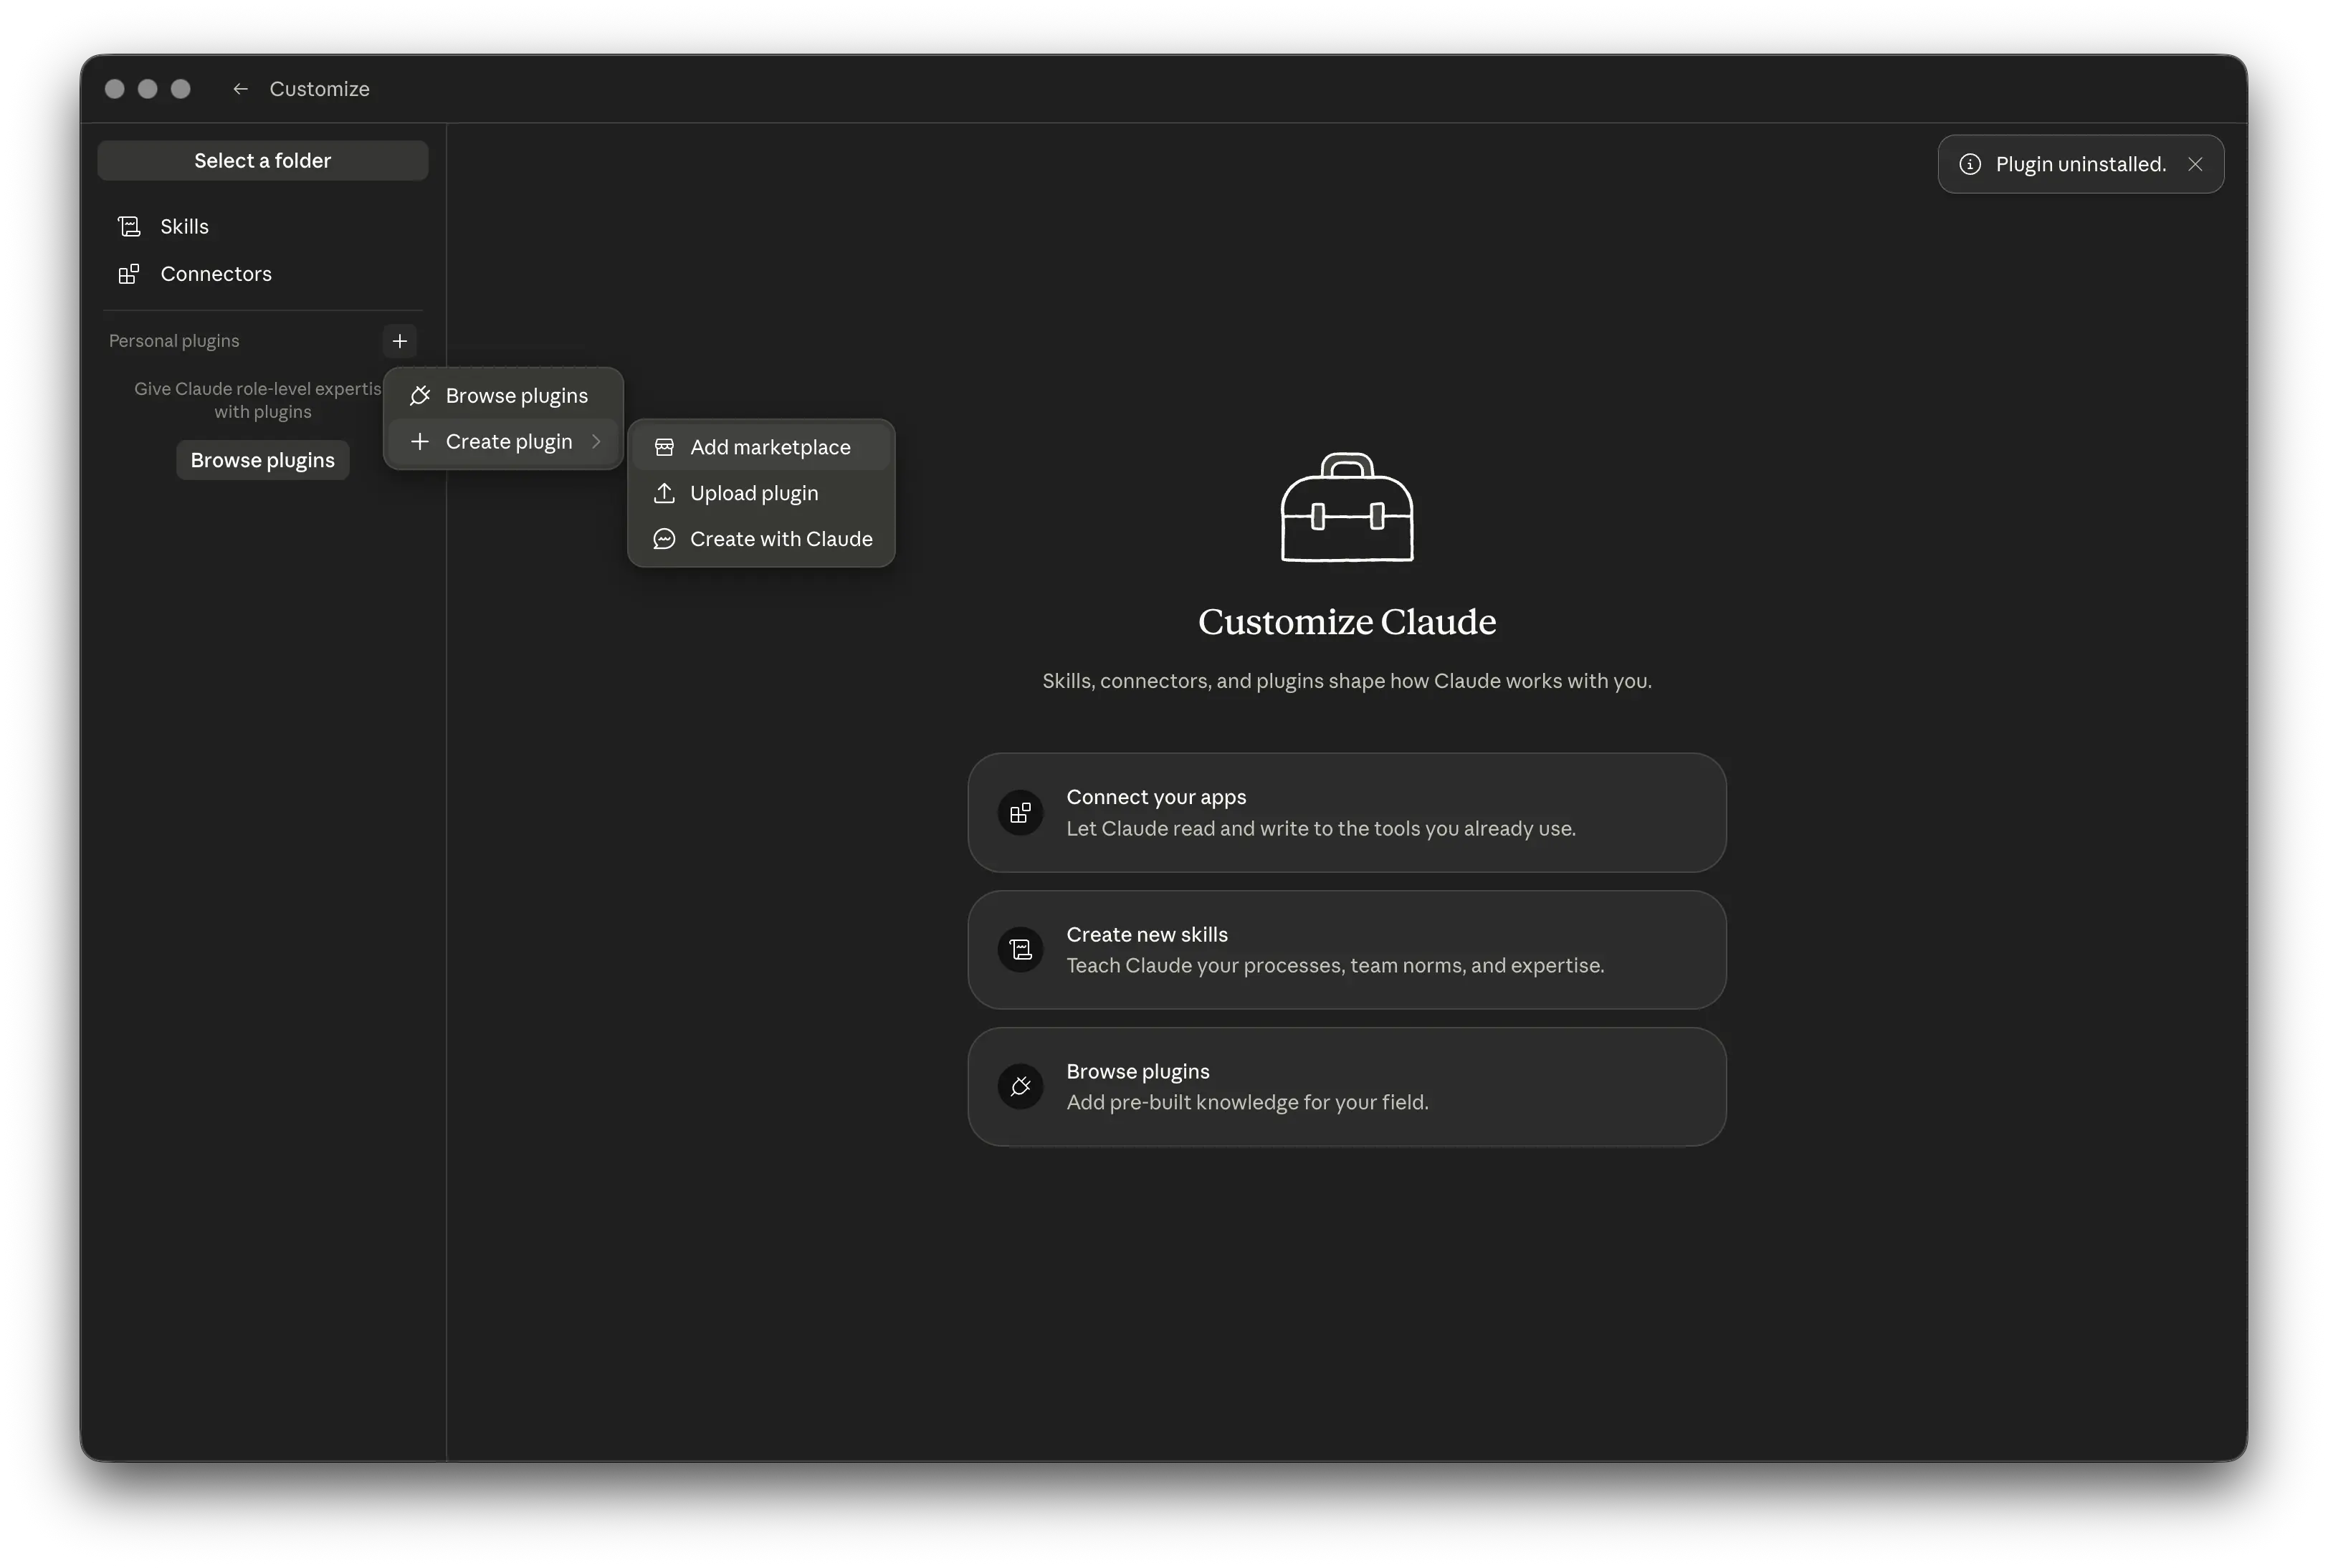
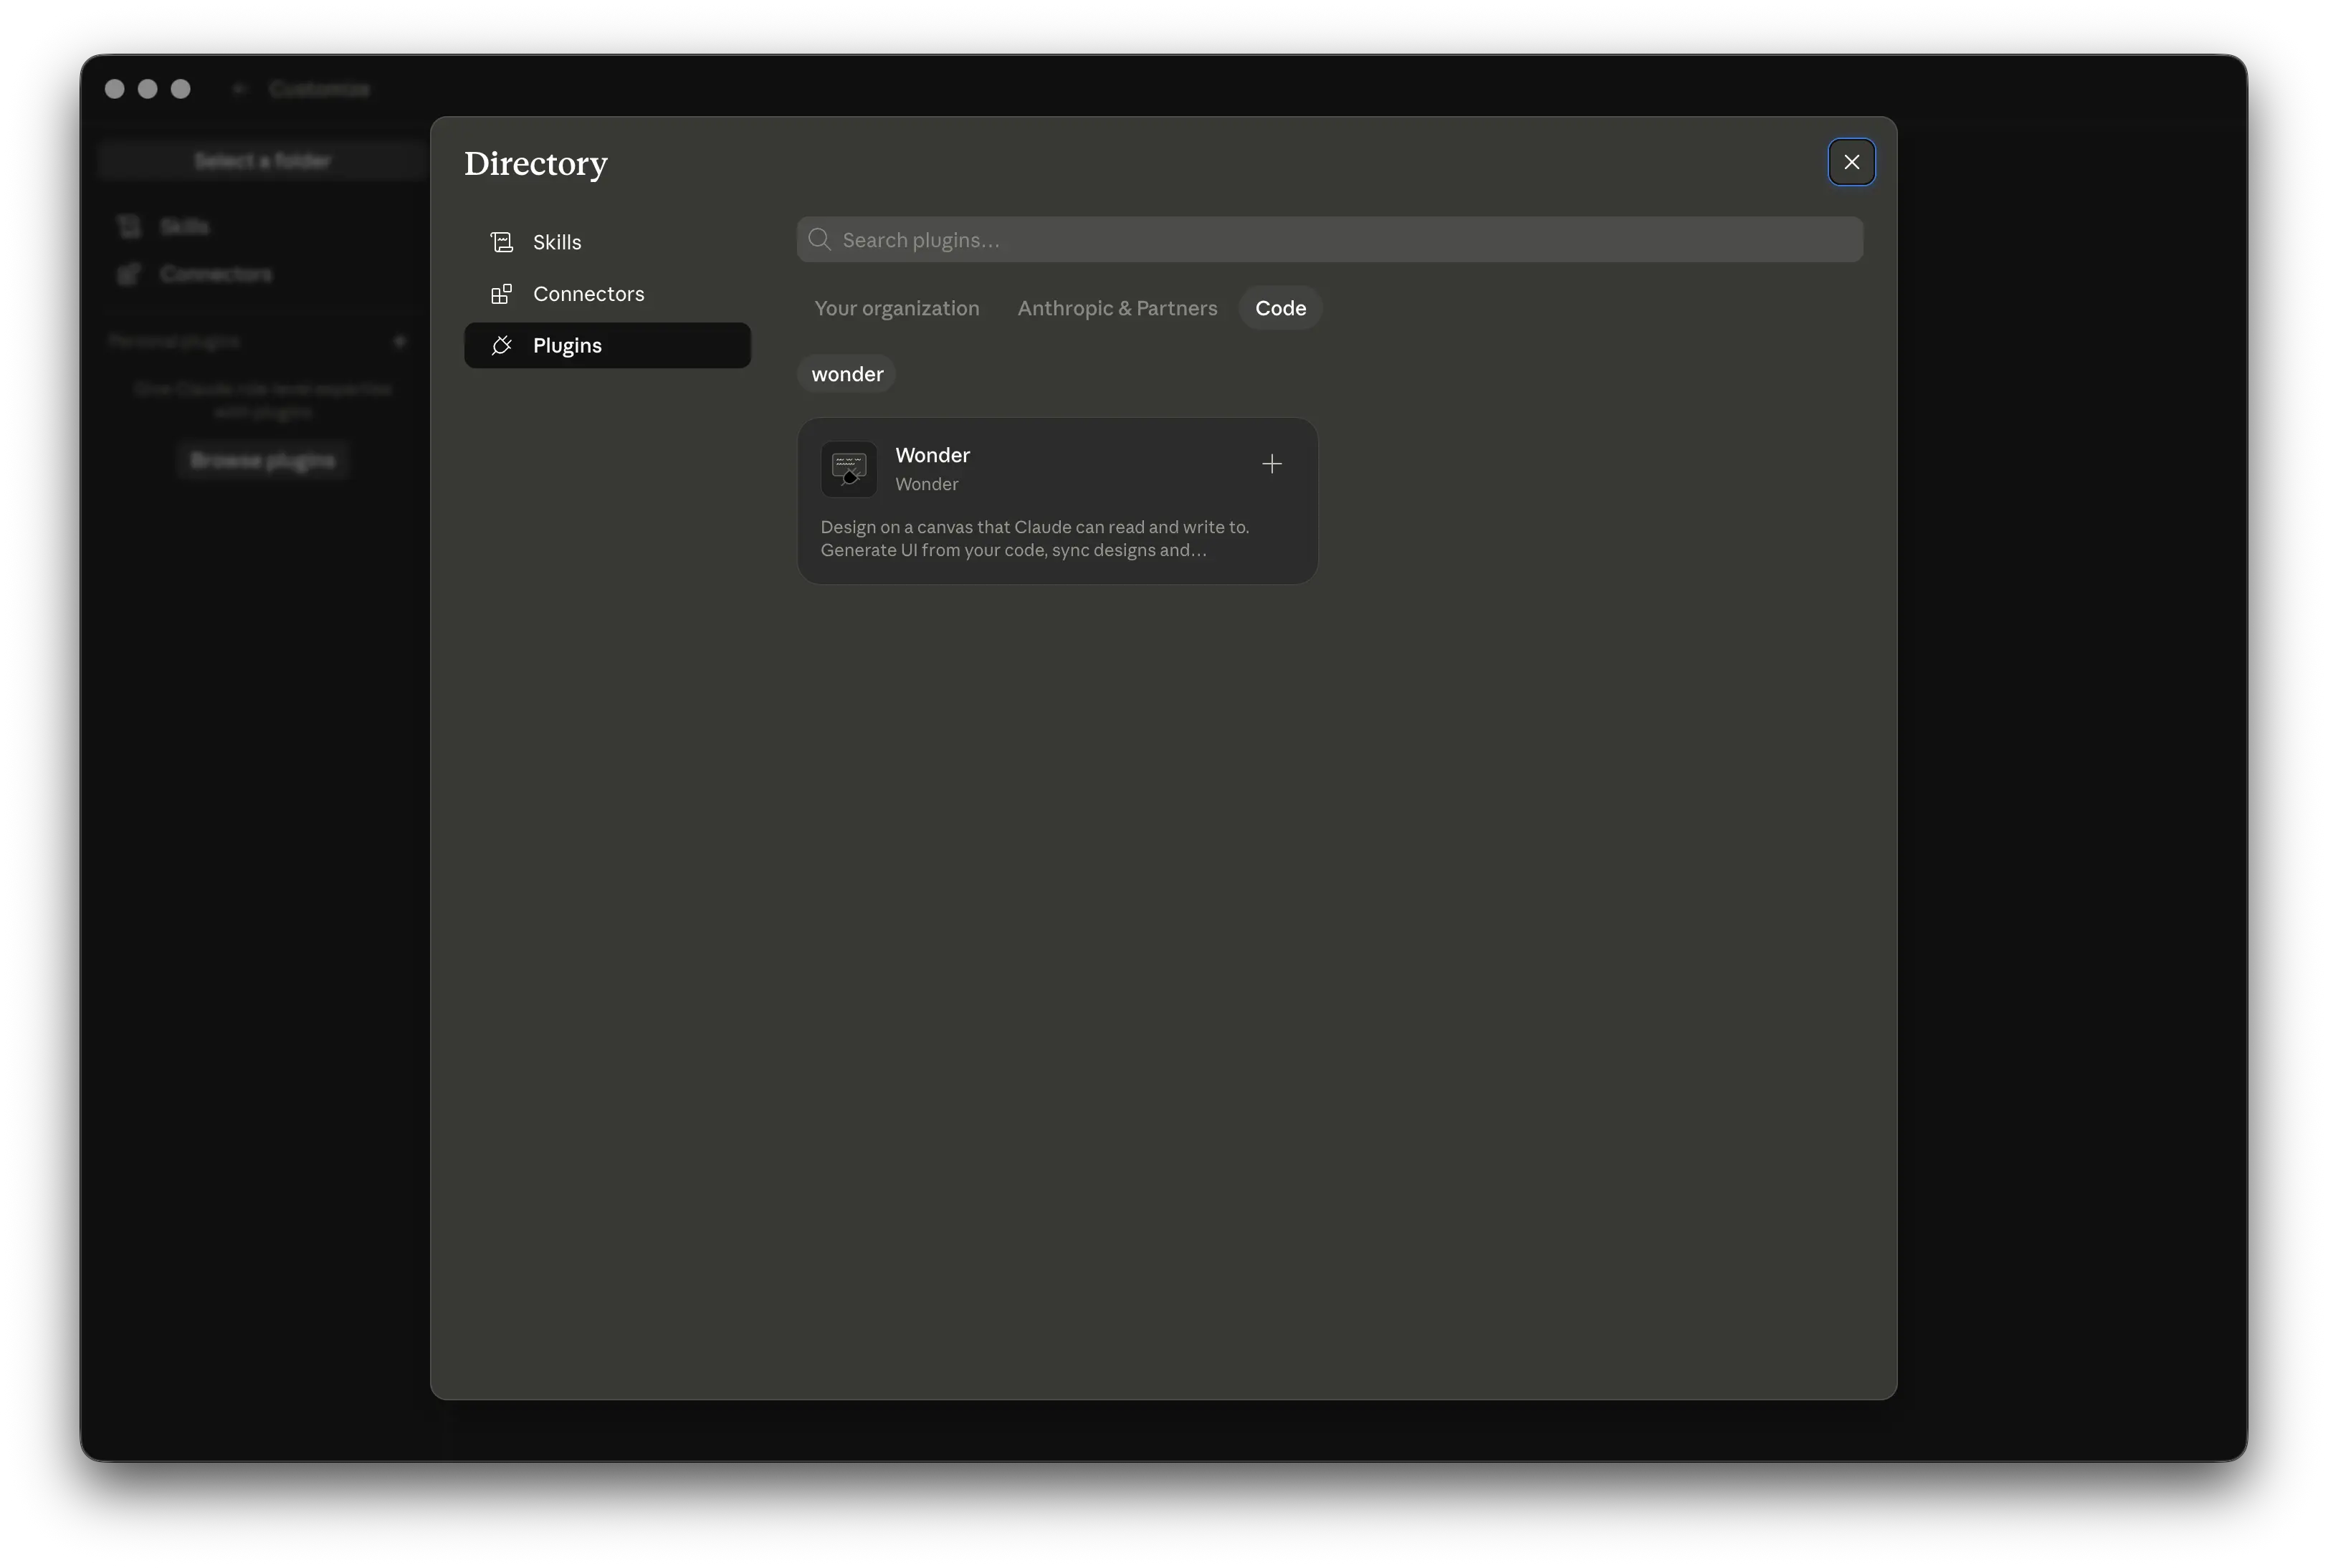
You should now see Wonder in your MCP list when you start a claude session in your terminal and run /mcp.
Manual setup
Claude Desktop requires Node.js to run MCP servers. Verify by running node --version in your terminal.
Open Claude Desktop Settings > Developer > Edit Config. This opens your claude_desktop_config.json file.
Your file probably looks something like this:
{
  "preferences": {
    "coworkWebSearchEnabled": true,
    "ccdScheduledTasksEnabled": true,
    "sidebarMode": "chat"
  }
}
Add the Wonder MCP section so it looks like this:
{
  "mcpServers": {
    "wonder": {
      "command": "npx",
      "args": [
        "mcp-remote",
        "https://mcp.wonder.so/mcp"
      ]
    }
  },
  "preferences": {
    "coworkWebSearchEnabled": true,
    "ccdScheduledTasksEnabled": true,
    "sidebarMode": "chat"
  }
}
Save the file. Make sure there's a comma after the closing } of mcpServers. Fully quit and restart Claude Desktop. A browser window will open asking "MCP CLI Proxy would like access to your account." Click Allow access. Once the browser confirms "Authorization successful!", close it and return to Claude. Check the chat input area for the MCP indicator to verify Wonder is connected.
Claude (custom connector)
If you use the Claude desktop app or claude.ai in the browser and don't want to touch the terminal or config files, add Wonder as a custom connector. This is the simplest way to connect Claude to your canvas.
There are two parts. An admin adds Wonder as a connector once, then each person connects their own Wonder account. On a personal Pro or Max plan you're the admin, so do both.
Add Wonder (admins)
- Open Claude (the desktop app or claude.ai).
- Go to Settings > Connectors.
- Click Add, choose Custom, then Web. In some versions this reads Add custom connector.
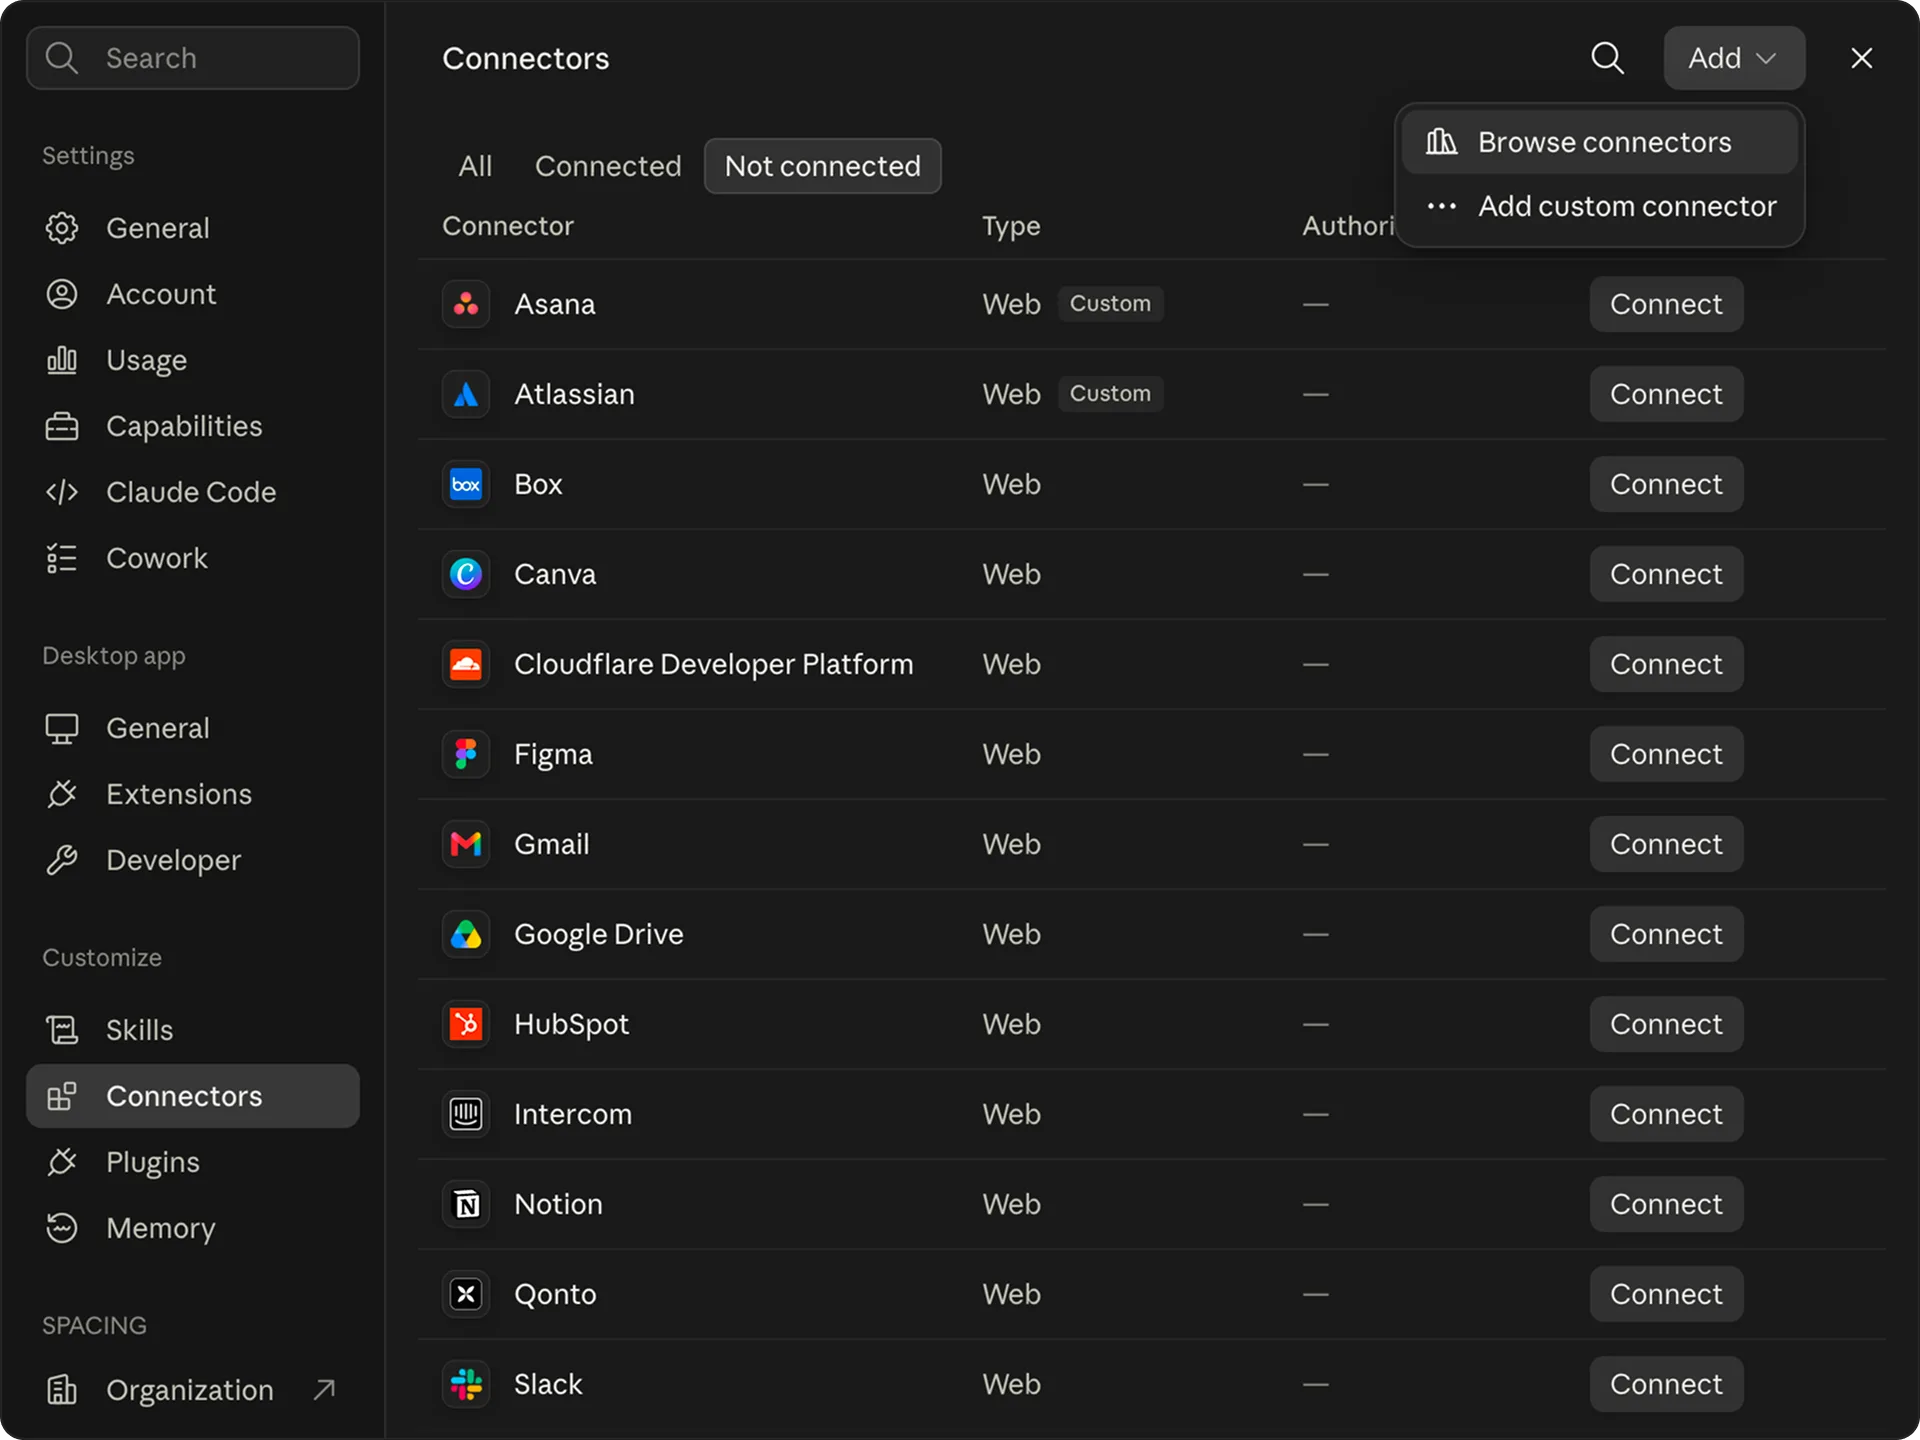
- Enter the following details:
- Name:
Wonder - Remote MCP server URL:
https://mcp.wonder.so/mcp
- Name:
- Claude auto-detects Wonder's authentication settings. Keep the detected defaults:
- Authentication: Always required
- OAuth client: Use Anthropic's hosted client metadata (Recommended)
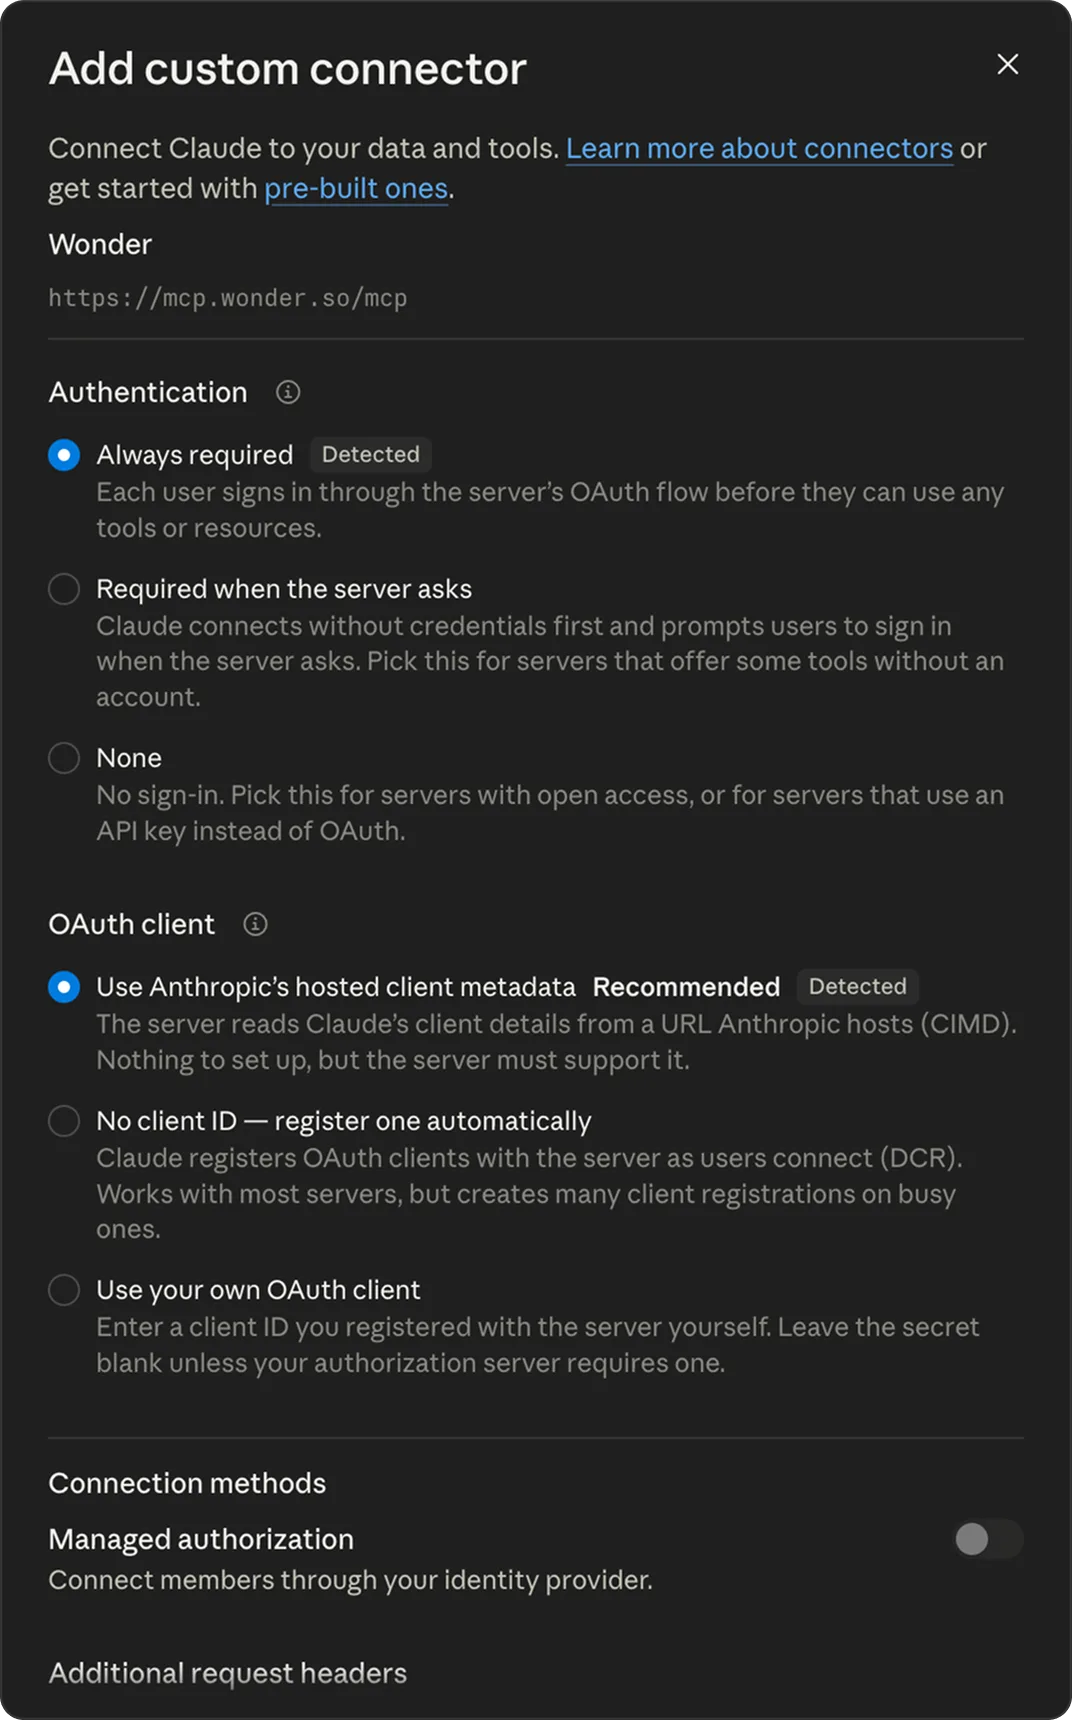
- Scroll down and click Add to make Wonder available.
Adding the connector doesn't give Wonder access to every member or file. Each person connects their own Wonder account and only sees files their existing Wonder permissions allow.
On Team and Enterprise, only a Claude organization Owner or Primary Owner can add a custom connector. If you don't see the option, you likely aren't an Owner or your organization has restricted custom connectors: send your admin this guide.
Connect your account (everyone)
- In Claude, open Customize > Connectors.
- Find Wonder in the list (it may have a Custom label) and click Connect.
- Sign in to Wonder and approve the connection.
- Open the Wonder connector settings. Under Tool permissions, set both groups to Always allow:
- Read-only tools: Always allow
- Write/delete tools: Always allow
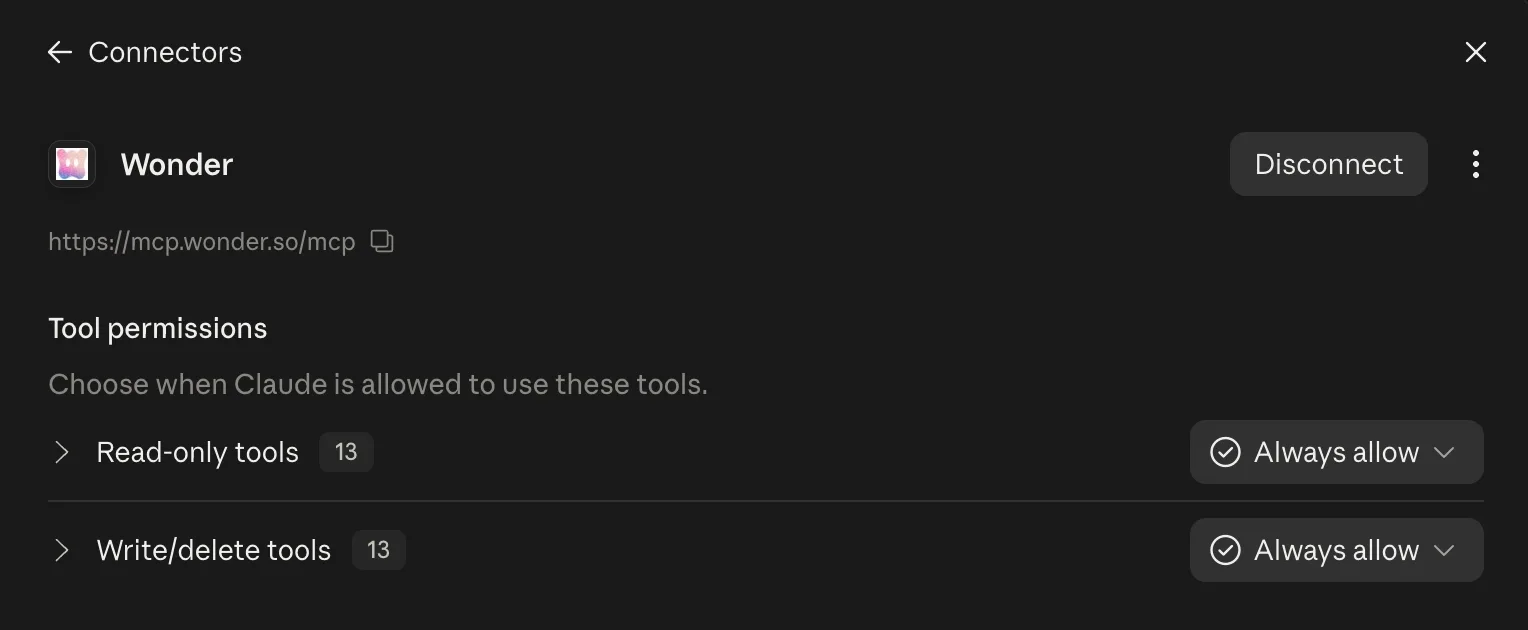
This lets Claude work without asking before every Wonder tool call. Claude can still only reach files your Wonder account permits.
- Open the Wonder web or desktop app and keep the canvas file you want to use open.
- In a Claude conversation, open + > Connectors and enable Wonder if it isn't already.
 Codex
Codex
Plugin (recommended)
- With the Codex CLI installed, run these commands in your terminal:
codex plugin marketplace add aquila-lab/wonder-plugins
codex plugin add wonder@wonder
Wonder uses a custom marketplace hosted on GitHub, so an official directory listing isn't required.
- Restart Codex and start a new chat. Type
@wonderand select the installed Wonder plugin.
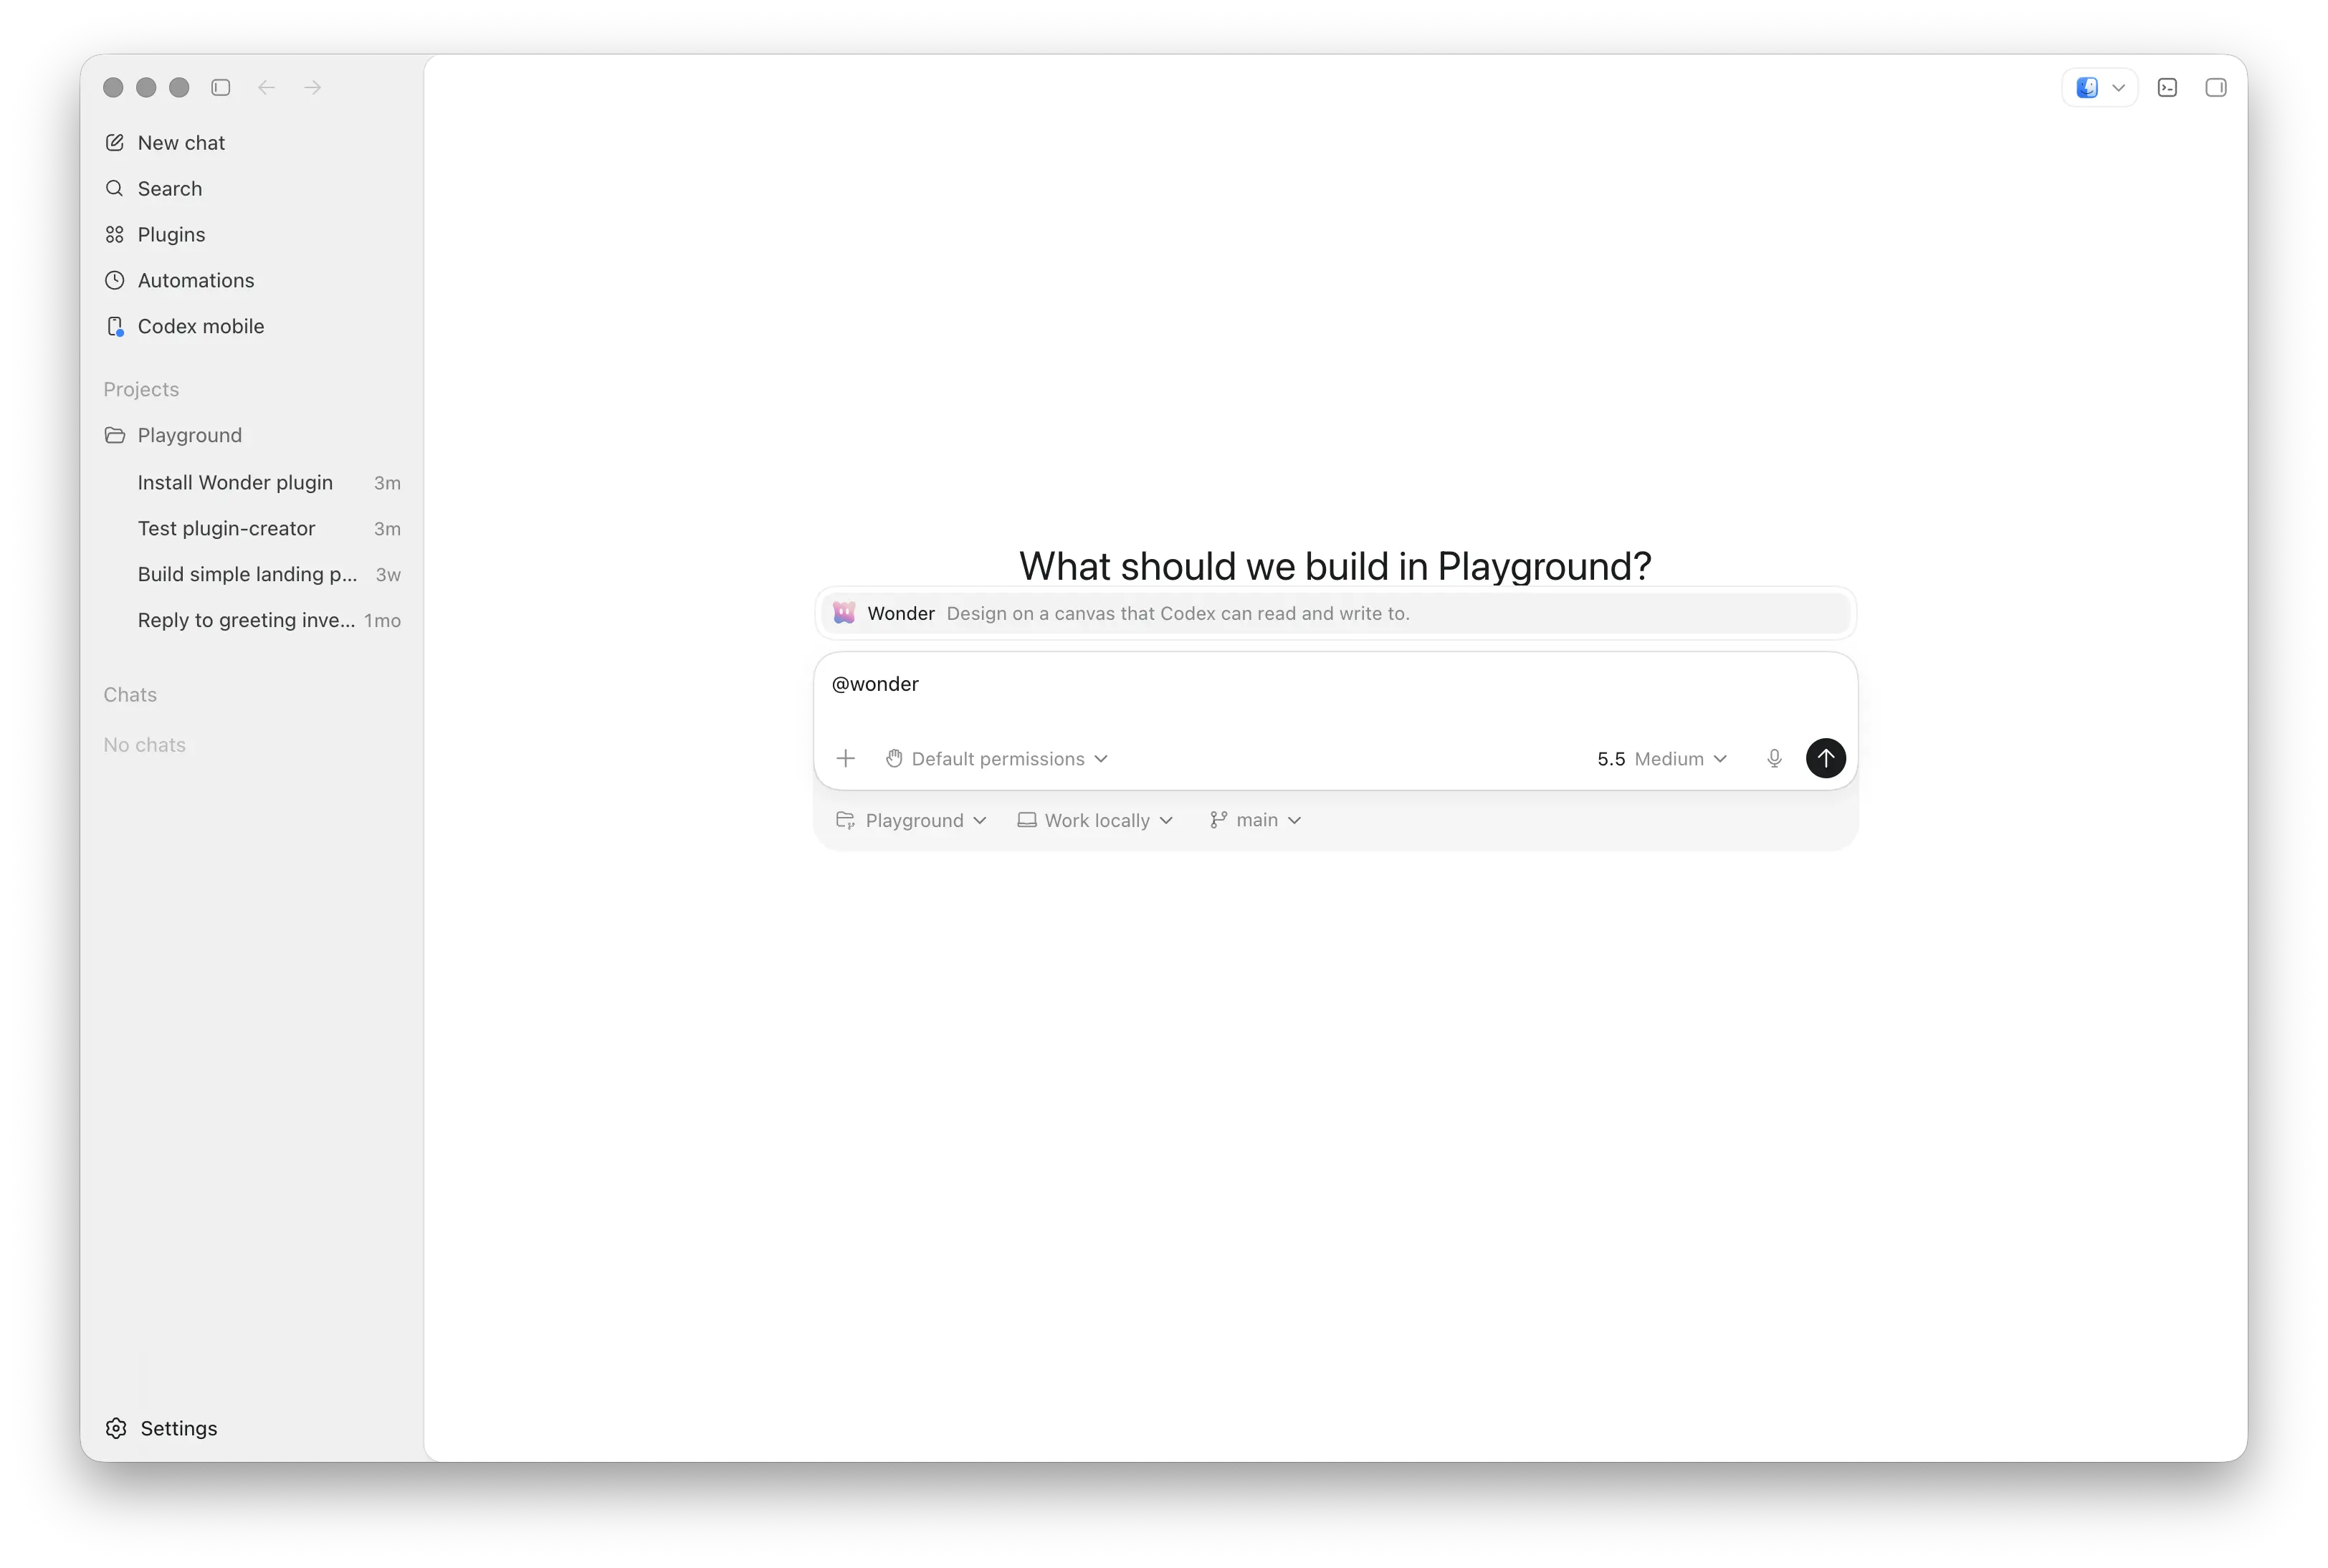
The Wonder · Computer use entry starts desktop automation. Select the installed Wonder plugin to use its MCP integration.
- Open a canvas in Wonder, then send this read-only connection check in Codex:
Use Wonder MCP to list the artboards on my open canvas without changing it. If MCP is unavailable or authentication fails, stop and explain how to connect it. Do not use computer use.- Complete Wonder sign-in when Codex prompts you, then retry the connection check. Confirm Codex calls a Wonder MCP tool and returns your canvas's artboards before asking it to edit a design.
The plugin's bundled skill guides Codex to use Wonder MCP for canvas operations and explain connection problems. It asks Codex to use computer use only when you explicitly request it. This guidance applies when the skill loads; Codex controls the app picker and global tool routing.
Manual setup
Run the command below in your terminal to register the Wonder MCP server:
codex mcp add wonder --url https://mcp.wonder.so/mcpYou can also configure it manually via config.toml. Run codex mcp list to confirm the Wonder server appears.
Restart Codex and start a new chat, then run the read-only connection check above and complete Wonder sign-in if prompted. Manual setup connects the MCP server without the plugin's bundled skill, so ask explicitly to use Wonder MCP.
 Antigravity
In Antigravity, click the ⋯ menu in the Agent panel > MCP Servers, then select Manage MCP Servers > View raw config. This opens your mcp_config.json file.
The file is located at:
- macOS / Linux:
~/.gemini/antigravity/mcp_config.json - Windows:
C:\Users\<USERNAME>\.gemini\antigravity\mcp_config.json
Add the following configuration. Note that Antigravity uses serverUrl instead of url for remote MCP servers.
{
  "mcpServers": {
    "wonder": {
      "serverUrl": "https://mcp.wonder.so/mcp"
    }
  }
}
Close and reopen Antigravity. Go to MCP Servers and confirm Wonder appears with its tools listed.
 Lovable
Custom MCP servers require a paid Lovable plan.
- Open Lovable.
- Navigate to Settings → Connectors → Personal connectors via the sidebar. Scroll down to New MCP server and click it. You can also click + in the prompt box and go to Connectors for quick access.
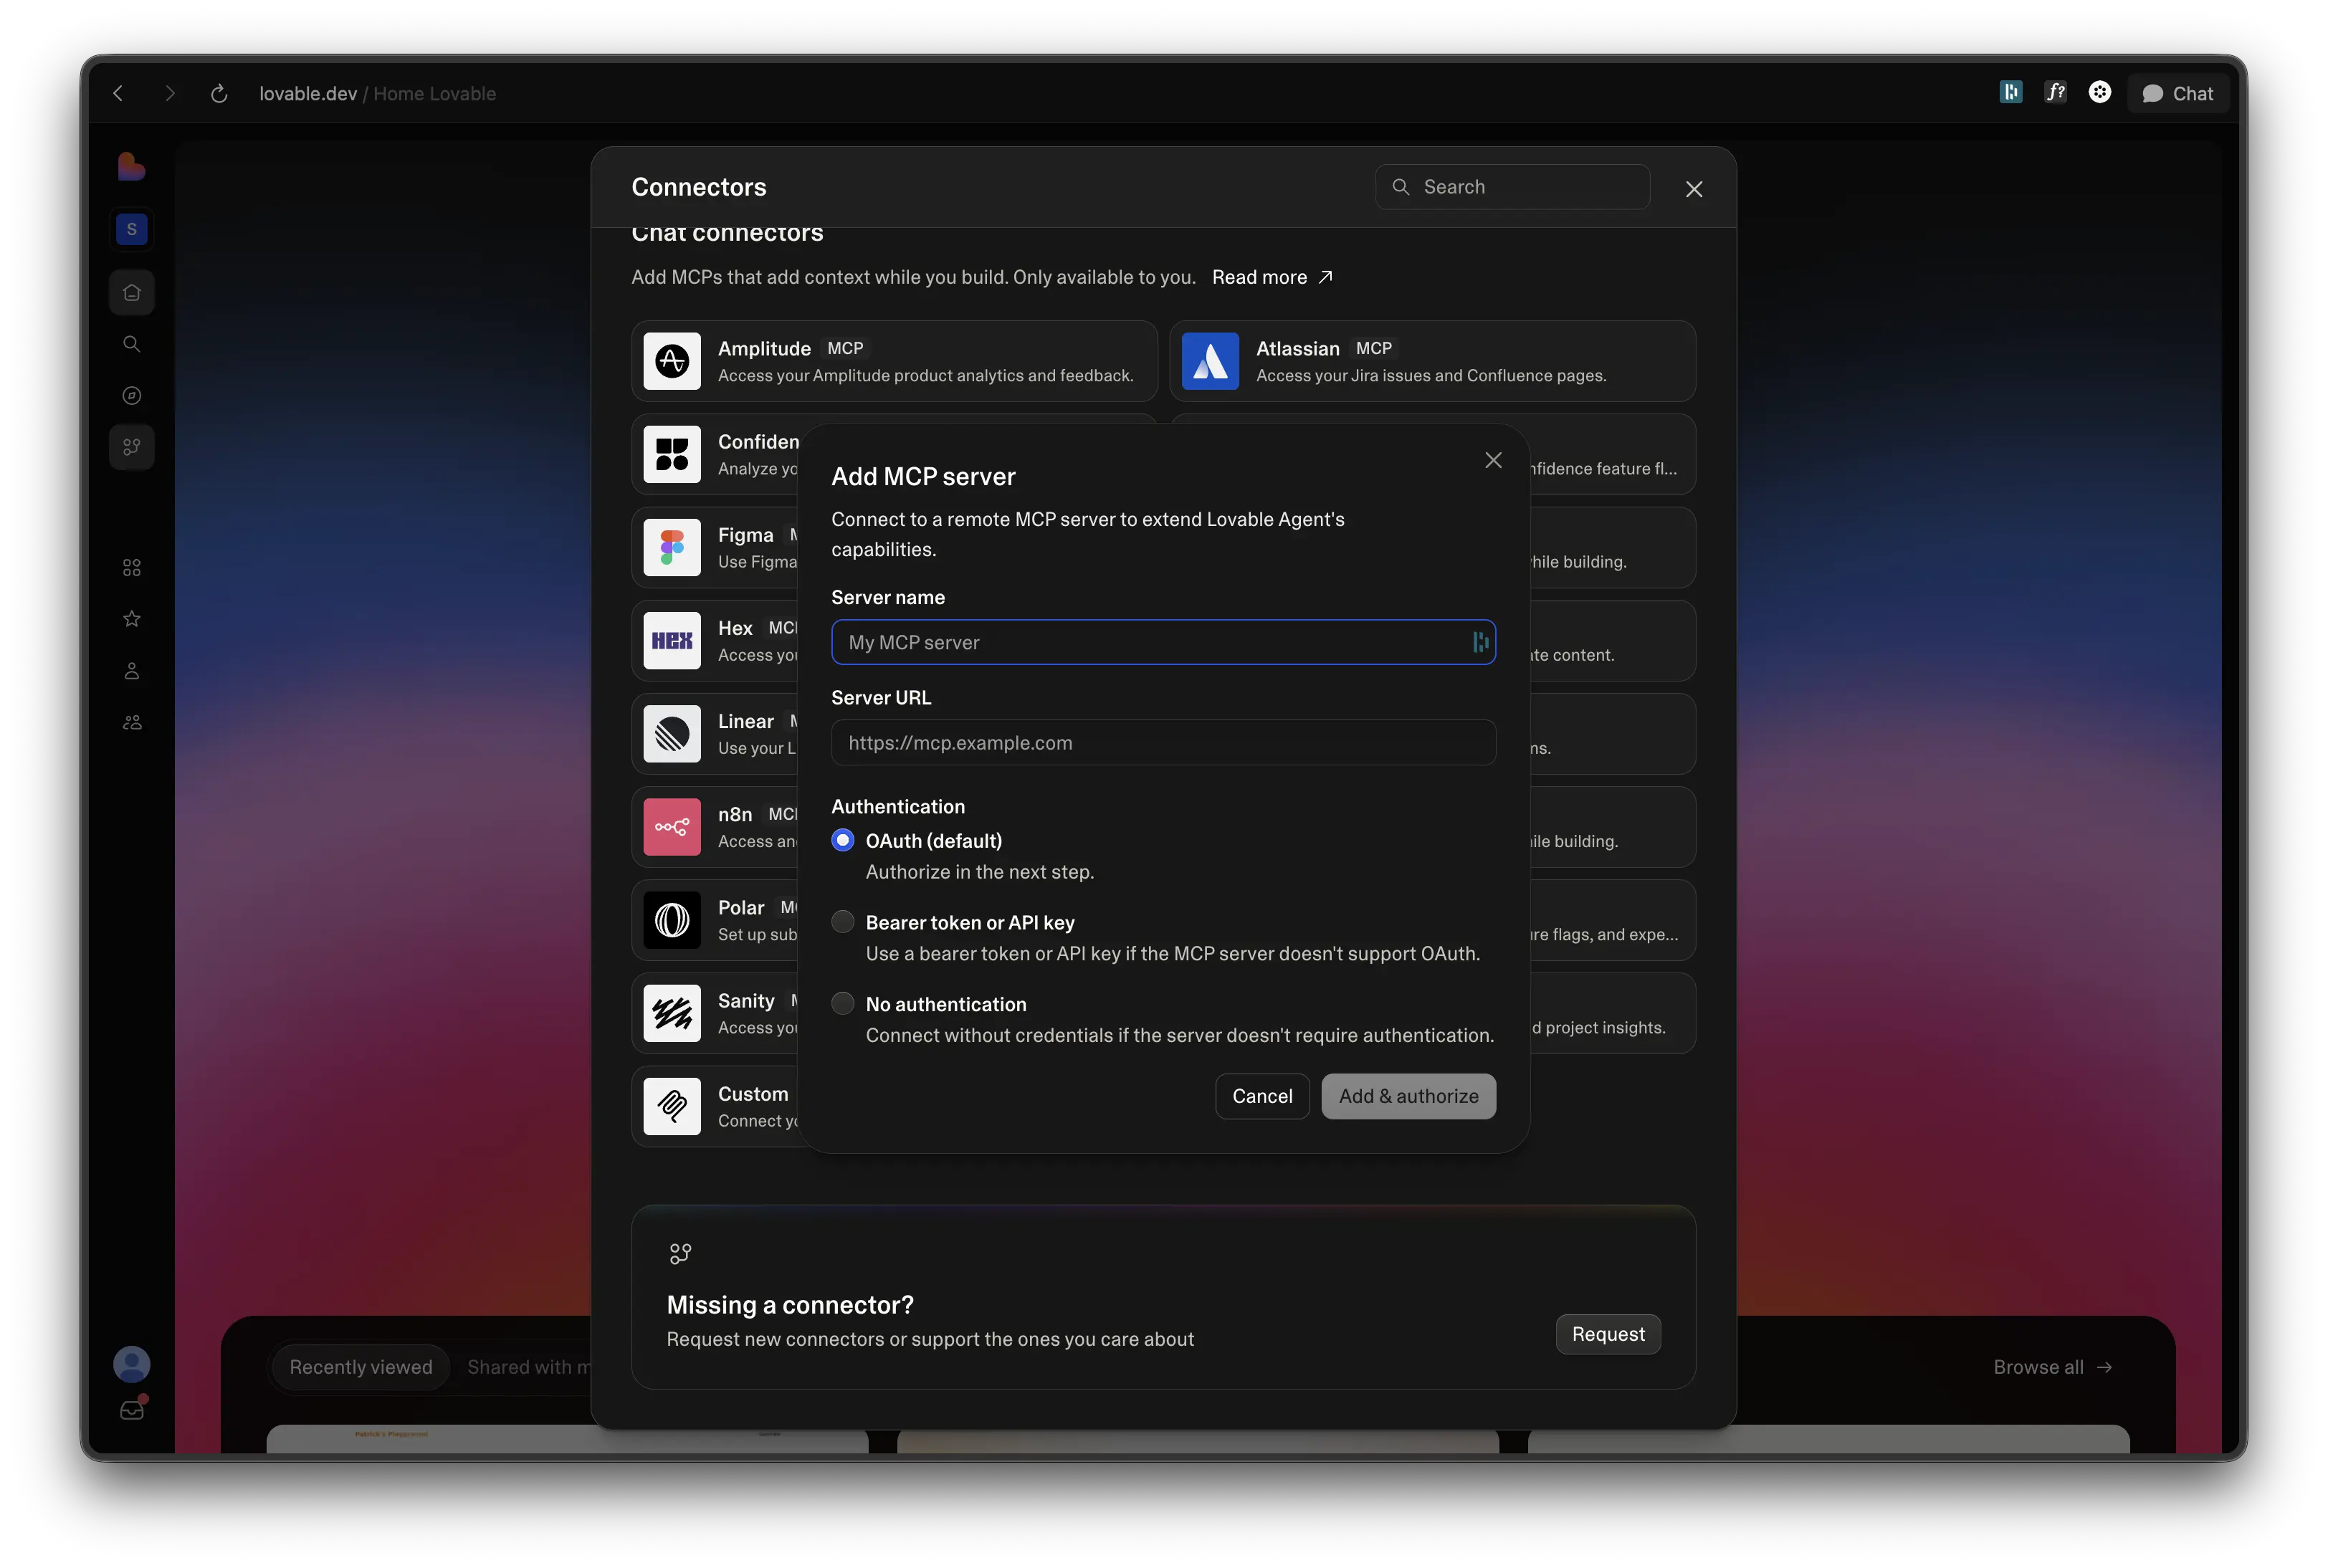
- Enter
Wonderas the MCP name and paste this URL:
https://mcp.wonder.so/mcp
- Select No authentication and click Add server.
Wonder will appear in your list of personal connectors. You can now reference your Wonder designs directly in prompts.
Other MCP clients
If your client isn't listed above, you can set up Wonder manually. The server URL is:
https://mcp.wonder.so/mcp
Most MCP clients accept a JSON config like this:
{
  "mcpServers": {
    "wonder": {
      "url": "https://mcp.wonder.so/mcp"
    }
  }
}
If your client doesn't support remote URLs natively, use the mcp-remote bridge (requires Node.js):
{
  "mcpServers": {
    "wonder": {
      "command": "npx",
      "args": [
        "mcp-remote",
        "https://mcp.wonder.so/mcp"
      ]
    }
  }
}
Try it out
Once Wonder is connected, open a chat in your agent of choice and try one of these prompts to confirm everything is working.
If you are in an existing codebase:
Read my Tailwind config and create a design in Wonder using my exact colors, typography, and spacing.
If you're starting fresh:
Create a simple landing page hero in Wonder with a headline, subheadline, and a call-to-action button.
To test the round-trip:
Look at my existing app's header component and design a matching hero section in Wonder.
Your agent will use the Wonder MCP tools to read and write directly to your canvas. Open Wonder to see the result.
Troubleshooting & FAQ
What does the Wonder MCP server do?
The Wonder MCP gives your AI coding agent direct access to your designs, components, and documentation inside Wonder. Instead of screenshotting or describing your designs, your agent can read the actual design data and generate code that matches what you've built on the canvas.
Do I need a Wonder account?
Yes. You need an active Wonder account with at least one project. The MCP server connects to your Wonder workspace, so the agent only sees designs you have access to.
Is the MCP server free?
Yes, the Wonder MCP server is free to use on all plans, including the free tier.
Does it work with Windsurf, VS Code Copilot, or Cline?
Yes. Any MCP-compatible client can connect to Wonder. Use the manual setup instructions above. The JSON config with "url": "https://mcp.wonder.so/mcp" works with most clients. For clients that don't support remote URLs directly, use the mcp-remote bridge method shown in the Other MCP clients section.
The Wonder server isn't showing up, or tools aren't working
Try fully quitting and restarting your agent. Most MCP connection issues resolve after a restart.
The MCP server is connected but the agent isn't using it
This usually means the agent doesn't know to look at your Wonder designs. Try being explicit in your prompt, for example: "Use the Wonder MCP to pull my designs and generate the landing page layout." Most agents discover the available tools automatically, but a nudge helps.
Why does Codex still use Computer Use?
The Wonder · Computer use entry requests desktop automation. Follow the Codex setup to select the installed Wonder plugin in a new chat, then run the read-only connection check. If MCP is unavailable or sign-in fails, resolve that connection problem before asking Codex to edit your canvas.
Can the agent modify my designs?
Yes. The Wonder MCP server provides both read and write access. Your agent can pull your designs as context and push new designs or updates back to the canvas.
I already added other MCP servers. Will Wonder conflict?
No. MCP servers run independently. Add the Wonder config alongside your existing mcpServers entries in the same JSON object:
{
  "mcpServers": {
    "wonder": {
      "url": "https://mcp.wonder.so/mcp"
    },
    "other-server": {
      "url": "https://example.com/mcp"
    }
  }
}
Where can I report issues or request features?
Head to our Feature Requests board or drop a message in our Discord.
Related
- Get started with GitHub: use your repository as the source of truth.